GUITAR BUILD UPDATE!

So the guitar build has been coming along at steady speed and I’ve had the photos of my progress for a while but not the time to actually post them….here’s what’s been happening:

20141001_110416

In the last update there were some shots of the body with template in place to route the tone chambers. As you can see from the above pic the remainder of the chambers have been routed…seriously could have built another guitar from the router shavings…lots of mess and serious router headache!

20141026_13225420141026_132232

…I also mentioned that the maple top had been cut. This two piece top was then glued to the chambered body and trimmed to size. The control cavity, cats-eye sound hole and switch cavity have also been cut.

20141112_201744

…then comes one of THE most critical areas of a bolt-on build. The neck pocket is routed using a template cut from the measurements of the neck heel and finessed by hand to result in a snug and accurate neck to body fit…

20141119_115402

…perfect centre-line placement is essential to ensure accurate string alignment…you can fiddle about with the template all you want but you only get to cut once!!!!…

20141119_201423

…once I’m happy with the template alignment i can go ahead and route the pocket. Care is taken to avoid tear-out around the flimsy edges at the neck pocket opening…

20150218_140556

…then it was time to route the pickup cavities…here I’ve loosely fitted my handmade scratch plate to check spacing. You can just make out the access hole i’ve drilled for the pickup wires. Ive also drilled the holes for the bridge thimbles…

20150218_14062020150218_140625

…on to the neck and i’ve filled the fret slot ends with rosewood to give a nice smooth neck edge with no visible fret tangs…and done some preliminary string nut tidying…

20150218_14331020150218_15100020150218_162602

…this seemed like a good point to get the neck on and get the alignment for the Bigsby sorted. This is fairly annoying procedure and would be sped up enormously with the addition of many more arms! Once i’m happy with the string alignment a drill the holes for the Bigsby screws…

20150315_11363520150315_11370620150315_11371120150315_113716

…then all the hardware is stripped off and it’s time to do some binding channel routing. Once the measurements are taken for my binding it’s time to fire up the edge-trimming router and CAREFULLY route the channel for the binding. Tight spots around the neck pocket opening are finished by hand…it’s just too easy to tear-out around these areas!!!…

20150318_12404320150318_124052

…once i’m happy with the binding channel and some sanding has been done to clean up it’s time to glue on the binding. Things are made much easier by warming the binding and rough-bending it to the shape of the body. Once the binding is roughly shaped glue is applied and the binding is held in place with super strong binding tape and left over night…

20150318_15164820150318_15170720150318_151730

…and when the binding tape is removed, and if you are lucky, all your shiny new binding is held in place beautifully with no gaps. After checking all over for a snug fit the binding is scraped back to the contour of the body…

20150325_16214220150325_162159

…back to the neck and it’s time to fit the tuners and do some more nut work. I also did a little more headstock/neck blending. As things start to come together and the guitar starts to become more..eeeerr guitary…then you can get a better feel for how the neck transition should feel…

20150325_162322

…we can then fit the scratchplate and the hardware and see if we like where we are…and we do!!!…

20150419_09215120150419_09222120150419_09231720150419_09224120150419_092250

…so we can stick the neck on, get some strings on and see how things are coming along. The output jack cavity is drilled and jack-plate fitted and as if by magic a guitar starts to appear. At this stage i do the rest of the fine adjustment work making sure EVERYTHING fits properly and feels nice…once you’ve done final sanding and applied lacquer the fine-tuning boat will have well and truly sailed!!!! Setup and fret leveling will be carried out once the finish has been applied.

So that’s where i am with this baby now. Once i can get my spray area cleared and cleaned we can get some shiny stuff on this thing.

Stay tuned for some final sanding, lacquer work and setup!

TFM

UPDATES AND ABSENCES!!!

Hi all!

A quick update regarding my lack of blogginess of late!

Due to some BIG changes at work and some events in my personal life I have had absolutely no time at all to indulge my geekiness via the blog.

Also some changes around my workshop and some more plans to push my own guitars has left me exhausted…there really aren’t enough hours in a day!

Anyway some more updates will be on the way very soon including LOADS of pics of the current guitar build and a sneak peak at the new build templates!

Watch this space!

TFM

GUITAR RESTORATION: GUILD S60

Right then, look what turned up this week….a 1978 Guild S60…right up my strasse…it’s old, it’s a weird shape, you don’t see many of them about…oh but wait…someone has done this to it!!!

RESTO1

RESTO2

As you probably can’t really tell from the photos this super cool 70’s post punk oddity has lived through one of the worst periods for guitar manufacture and modification….the 1980’s! For some reason it became uber fashionable to strip the finish from a guitar…not a problem in itself, other than removing original finishes, as most timbers will improve tonally from having less finish “stuck” to it. However the problem i have with this fad is that the people who seem to do this always seem to be the most technically inept people on earth! I see this time and time again on collectible guitars from all eras prior to the 80’s…finishes chemically stripped…poorly and then varnished….with a brush!!!! Why the f**k go to all the trouble of stripping a guitars finish then apply fence paint with a decorators brush?!?!? I have never figured it out but trust me it is very common to see! So this guitar probably started life as a sunburst, black, white or cherry finish but here is where we are at…

RESTO6

RESTO7

RESTO5

RESTO4

RESTO3


RESTO14

…everything on this guitar has been smothered with horrible thick sticky varnish…yes that’s right including the entire fretboard and frets AND the scratchplate….thats right the SCRATCHPLATE…seriously people who do this sort of thing need punching very hard in the face! So judging from the over..err..brushed scratchplate then I’m guessing…

RESTO9

…yep, off comes the scratchplate and there you go…the original cherry finish!!! Looks like this donut could take the lid off some varnish but couldn’t remove a scratchplate from a guitar!

Any how that’s what we are up against. Now considering this is a well made USA Guild guitar and has some collectability value we could shoot for an original spec restoration back to the way things were, however, as the customer has no concern over its “vintage” value and he also picked it up for almost nothing due to its condition coupled with various, seemingly random holes throughout the body i think an original trans-cherry finish would be out of the question so i think this one’s gonna get some hot rod treatment!

Taking this thing apart gives me the surprise of….no more surprises! This little beauty is rare for two reasons a) apart from the finish and weird holes everything else has been left alone and not 80’s’d up…original Guild USA pickup and harness and b) no headstock/neck fracture…rare for a guitar such as this!

RESTO11

RESTO12

One of its coolest features is this very nice “space control” style roller bridge:

RESTO10

Kind of looks like the offspring of a Gretsch SC and Mastery bridge…would be a shame not to have a Bigsby on the other end!!!

Regardless of what’s going to go on it we first need to get stuff off it! Starting with that horrible gloopy varnish…

RESTO15


After carving through the “finish” we reveal a tidy looking headstock complete with serial number stamp.

RESTO16

RESTO18

RESTO17

…as you can see things are already getting better for this guitar…and as the body is returned to the way it started its life you can really see how horrible the varnish custom job on the fretboard is!

Realistically if we are going to the effort of re-finishing the body then the only way to clean the fretboard properly is to pull the frets sand out the sh**y finish and re-fret with slightly less 70’s super low profile frets…

RESTO20

RESTO19

RESTO21

…after having removed frets from guitars like this before i made sure i made use of my valved spraying mask when heating the frets for removal as the smoke kicked-up by varnish is pretty horrible stuff! Other than filling my workshop with nerve gas the fret removal was pretty smooth…now to sort out that mess of a board…

RESTO22

RESTO23

…there we go…i knew there was a nice guitar in there somewhere…and actually a lovely bit of rosewood under all that slime! The neck on this thing is actually in great shape and straight as a die so sanding and cleaning was fairly straight forward.

Well that’s it for now on this baby…she’s definitely looking better now! Next we will be plugging some of those random holes and giving her some new frets!!

Stay tuned!

TFM

GUITAR BUILD UPDATE!

OK so it’s been a while since I had any time to work on the Synchrocaster but there has been some progress…

BUILD1


BUILD5


…The tone chamber routing template has been cleaned up and fixed to the front of the body….let routing commence!!!…

BUILD4

…as you can see there is a LOT of material to be taken out of the tone chamber sections of the guitar! At this point the guitar’s top has been matched and glued, when it’s dry i’ll get some snaps of that too but for now the neck needed some attention…

BUILD9

BUILD10

BUILD12

…as you can see from these pics the headstock transition has been smoothed out and shaped to my liking. I like the feel of  mid 60’s Jazzmaster necks so there is a tip of the hat to those here…

BUILD7

BUILD6

BUILD8

…the headstock face was originally intended to be paint-matched to the body but i’m really digging the grain pattern in the maple so maybe this one’s just gonna get some stain!

BUILD11

BUILD13

…the heel transition has also been cleaned-up and sanded, the heel end has been left rough for now until i make the pocket routing template.

So that’s where i’m up to right now, since the last update the Bigsby, mustang bridge and pickups have arrived!..once i have excavated the tone chambers fully i can lay everything out for a sort of super-dry fit together!

Stay tuned!!!

TFM

GUITAR SETUP: WASHBURN N2P

So, after a loooooooooooooooooong time out, here is a promised post on a guitar setup!

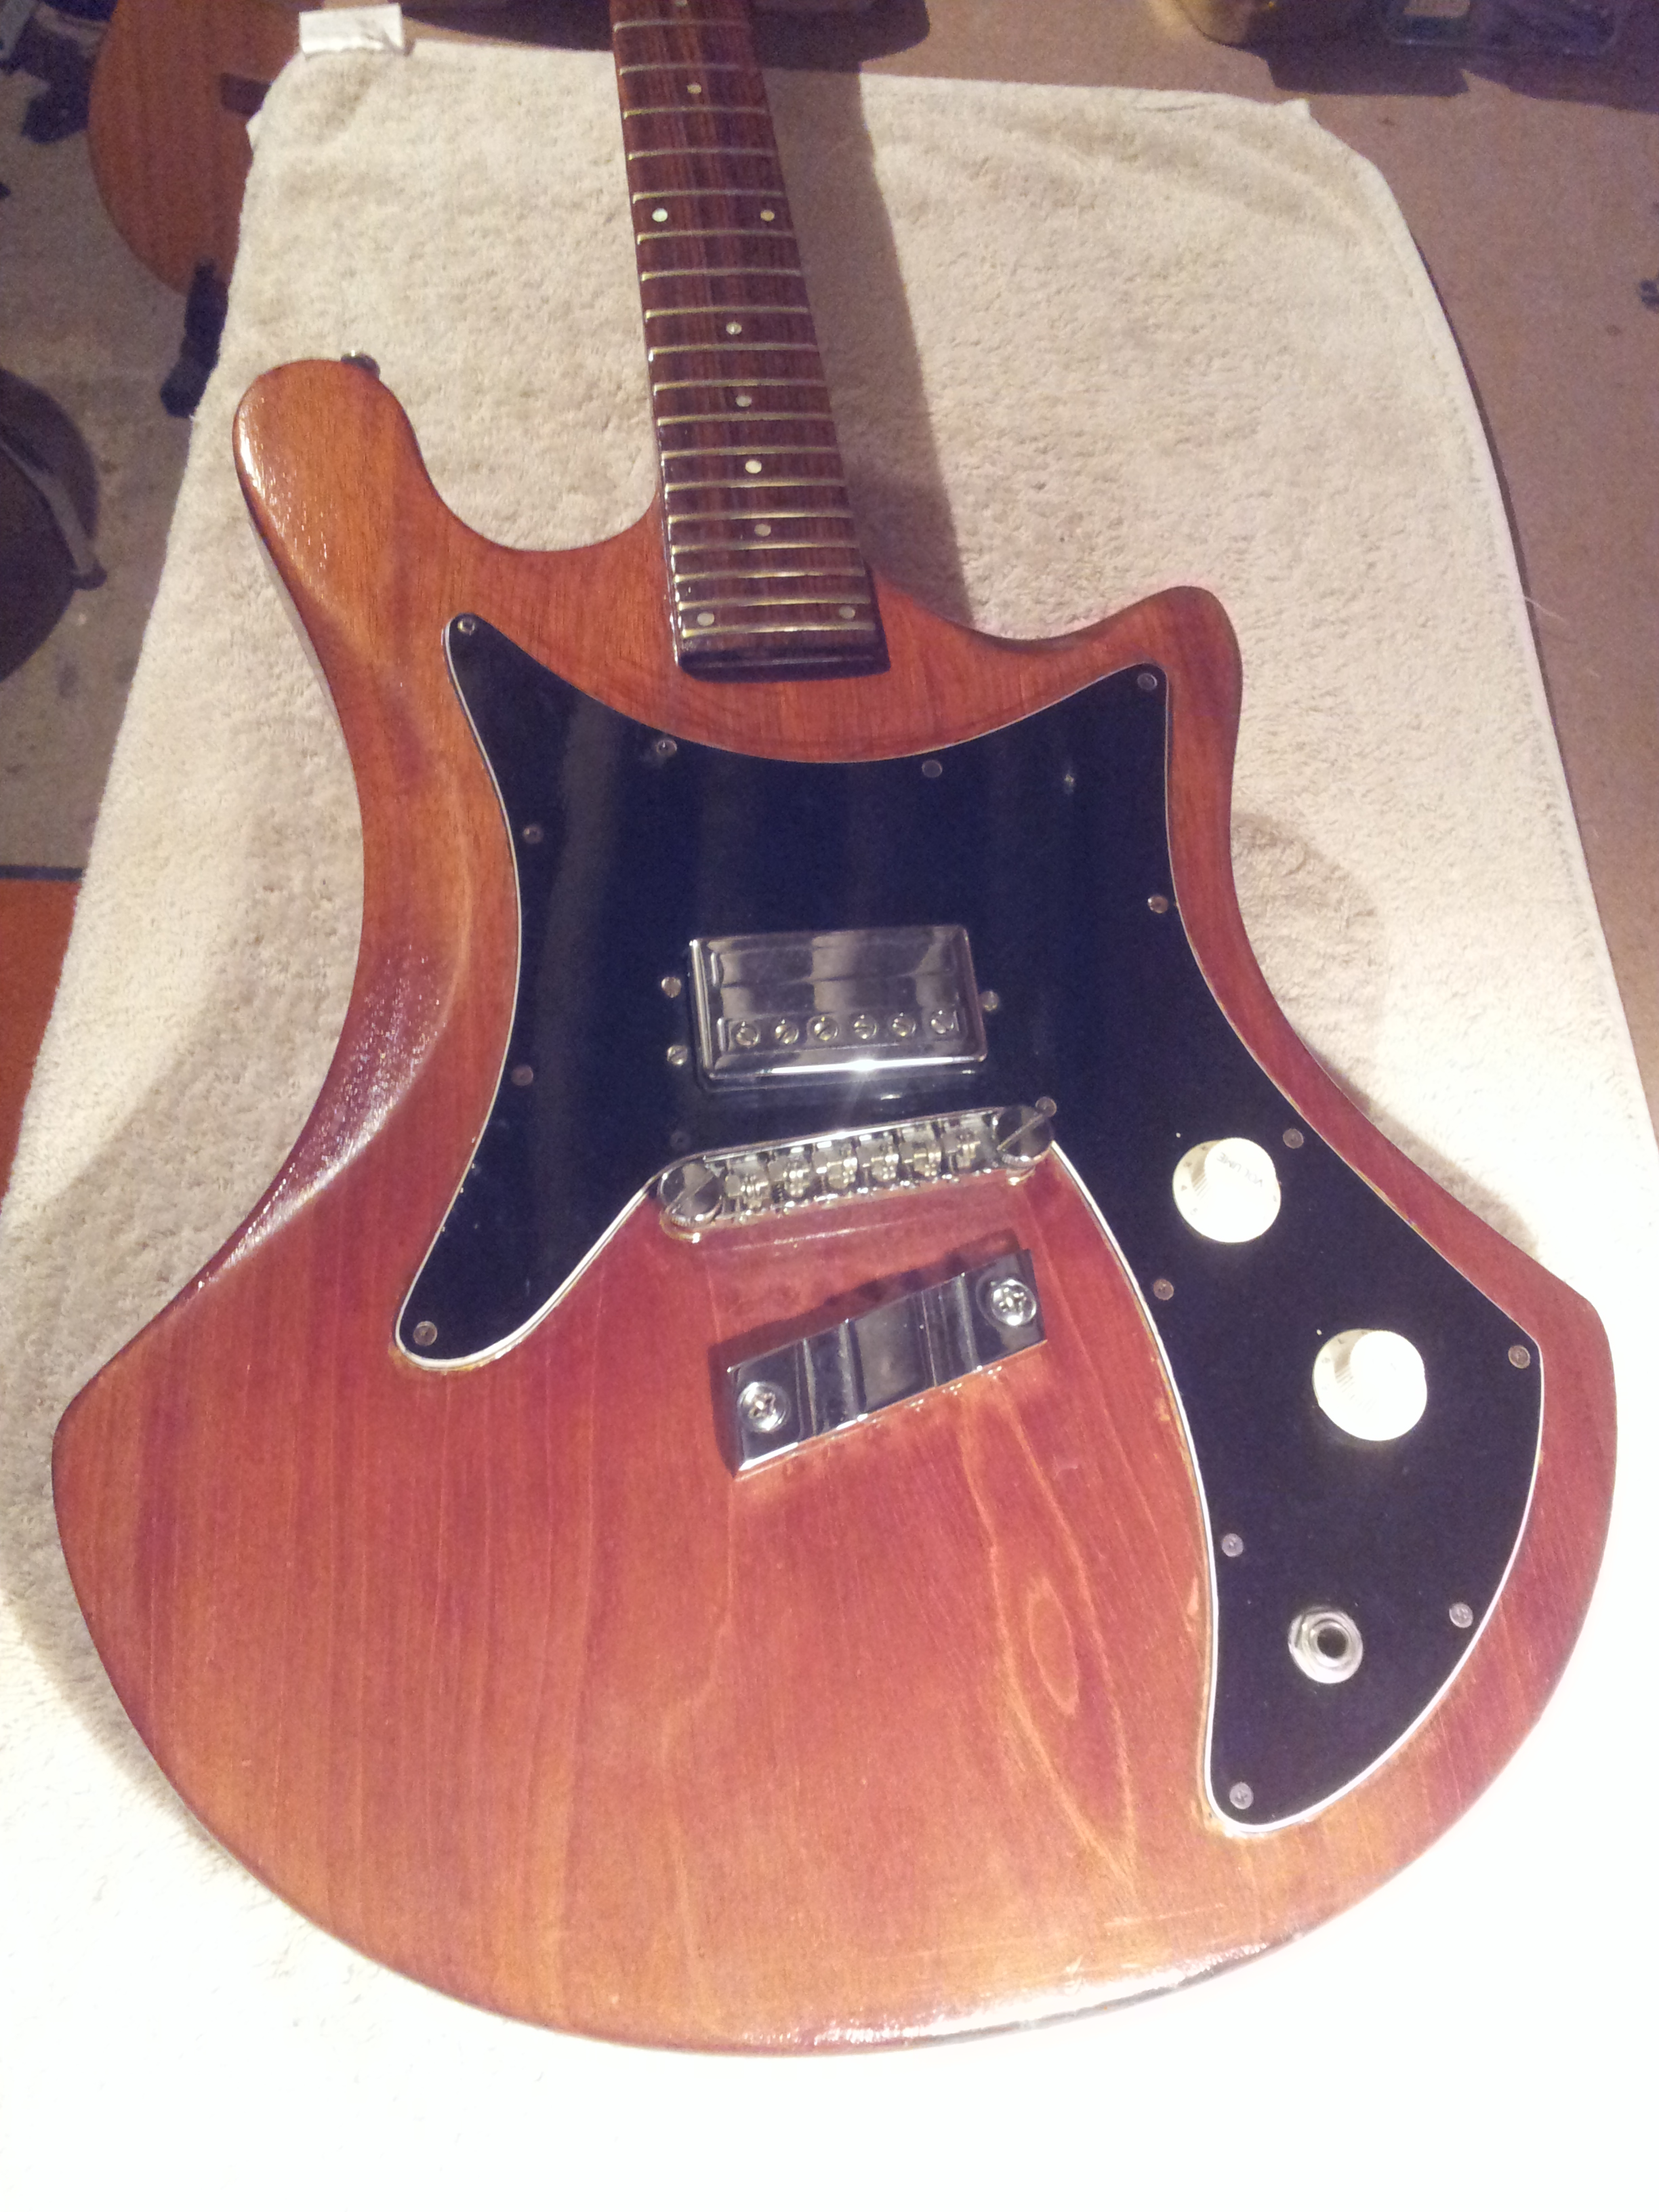
A customer of mine and all round nice-guy Nick dropped by with his Washburn N2P….

N2-1


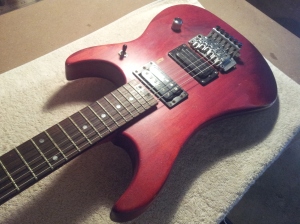
The guitar in question is pretty special to Nick, he’s had it since the 90’s and was one of his very first guitars…i’m sure a lot of you will appreciate the importance that would hold for a musician!

Any how, this thing hasn’t been touched for a looooong time and is looking a little worse for wear. I had recently done some work for Nick on his number 1 gigging guitar so, impressed by the results, he wanted me to return this, once fabulous, N2 back to her best.

Now, the first thing we want to do with a guitar that needs work, before breaking out any pointy tools, is to take a good look!

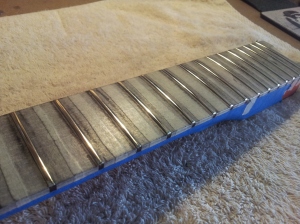
We look at the guitar and try to establish any problems with it before we fiddle with ANYTHING. We give it a good look over from all angles and give it a little play too if string condition allows. We are looking for things that look “odd”, that don’t look quite right. We do this to try to ascertain the cause of any irregularities in the guitars playability. From first inspection of the guitar the main areas of concern seem to be fret wear, an un-balanced Floyd Rose tremolo and, partly as a result of the previous problem, a high playing action:

N2-11

N2-7

N2-8


Once we have had a good look at the overall physical condition of the guitar it’s then time to bust out the measuring tools and take some of her vital stats!

This step is UBER important!  It’s important for two main reasons; 1) measuring the guitar’s vital areas of performance gives us a great indication of what is likely to need doing and where it’s likely to need doing to remedy its poor playability and 2) When you have finished setting up the guitar you have a great reference for how much you have done, not so you can show off but so you can calculate exactly how much adjustment was needed and how much disparity there was in key areas between pre and post setup.

So, the critical areas i ALWAYS take note of before i touch ANYTHING are:

PLAYING ACTION- The distance between the underside of the outer E strings and the top of the 12th or 17th frets.

NUT ACTION- The distance between the underside of the outer E strings and the top of the first fret.

NECK RELIEF- The distance between the underside of the strings and the top of the 7-9th frets when the string is depressed at the first and body/last fret (see WTF section on relief!)

FRETBOARD/BRIDGE RADIUS- Checking the curvature of the fretboard and if it matches the curvature across the string spread at the bridge.

TREM FLOAT- Checking for correct bridge pitch for optimal tremolo operation where applicable.

Looking at the photos above gives us a pretty good indication that the playing action and trem float are going to be…well… epic!

So here are Nick’s N2’s vital stats pre-setup:

PLAYING ACTION- 7/64th” on the bass side and 6/64th” on the treble side when measured at the 17th fret…..that is high, even for a more traditional country-style Les Paul action that is on the high side so for a super-Strat guitar that is way out of the park!

NUT ACTION- 0.022″ on the bass side and 0.0015″ on the treble side…not rediculously high, in fact this probably isn’t far off factory settings for most guitars but a little higher than i like to see on “shredder” style guitars.

NECK RELIEF- 0.020″ measured at the 9th fret…again this isn’t far away from factory spec but way higher than i want to see, especially since it’s going to get lovely level frets!

FRETBOARD/BRIDGE RADIUS- The N2’s fretboard measures an expected 12″…unfortunately the bridge does not correspond to this at all….this is a key area for player comfort. If you imagine lightly laying a finger across the fretboard as in a barre shape, if the string radius is “out” then some strings will not contact the fret at the same time making the barre you have made feel horrible and buzz like crazy……eeeerghhh!!!

TREM FLOAT- 4/16th”…..bad! With the bridge pitched up like this the tremolo system will not return the bridge to the correct position for stable tuning as the system is not in equilibrium.

OK, so now we know what the stats are we have an idea which areas we will need to make critical ajustments to a make this baby play right! BUT…before we rip the strings off and start poking about the last test we need to carry out is an electrical check.

On plugging in the N2 it became obvious that we have a problem! This guitar has 2 humbucking pickups sharing one master volume push/pull volume pot which splits the coils at the bridge pickup switching between a single coil and humbucker sound. The neck pickup works fine but the bridge pickup works in the “split” position only…not good! Time to “pop the hood” and check out the wiring!

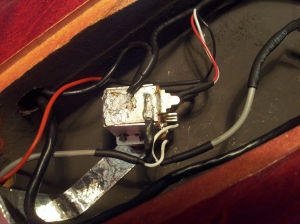
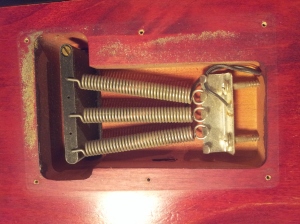
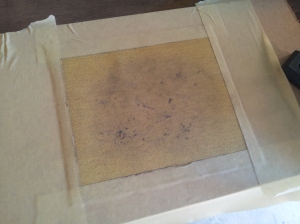
Once the back plate  was removed i was presented with this:

N2-42

N2-38

N2-48

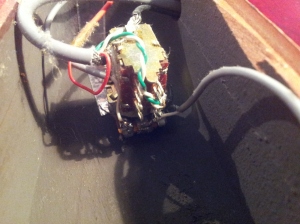
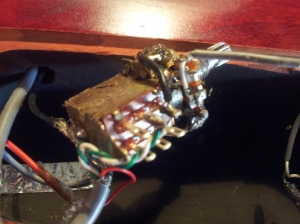
This is NOT what you want to see when embarking on an electrical fault-finding mission!

For those of you unfamiliar with how guitar wiring should look…this is not it! Solder joints are messy, blobby and dry/cold, wires are under strain, shielding is messy and likely to short, insulation is stripped too far back leaving too much exposed signal conductor, again, likely to short. When wiring is this bad your only option, if you want to do a good job, is to re-wire the whole thing as at some point, even if you fix the main fault, another one is just around the corner!!

So, after taking off the strings and removing the wiring loom, switch and pot it’s time to test! The pickup selector tests ok, the pot is functional but the shaft continually spins round so the pot’s wiper goes from fully open to dead short and round again…operational but, clearly, not right! We know the neck pickup works so we need to test the bridge pickup.

A humbucking pickup that is wired for coil splitting will be of four-conductor construction, here is a wiring schematic to explain the function of each conductor:

billlawrence

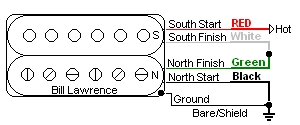
From this schematic we can see the normal humbucker connections for this style of pickup would be between the ground/north start and hot/south start. Under normal humbucker conditions the south and north coils are wired together in series but in a coil split situation we can take a signal “tap” from the white/green conductor(s) which will give us either the north coil only (ground to green/white) or the south coil only (green/white to hot)

So let’s test this pup and see what we have:

N2-45

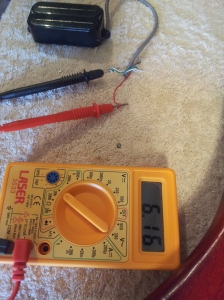
As the photo above shows, when measuring (using the DC resistance setting on the multimeter) between the green/white and hot conductors ( south coil) we read a healthy 6.16 ohms ( most single coil pickups will measure between 4.5 and 7.5 ohms….ish!)

So this will be the single coil we are hearing when the pot was in the “split” position. Now it’s time to test the rest of the pickup:

N2-51

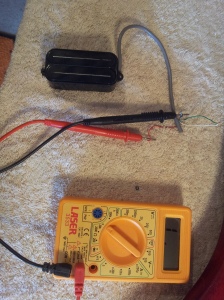
Now we connect the ground and hot wire to the multimeter ( normal humbucker/coils in series wiring) and…oh dear! As you can see from the photo the meter is reading infinite resistance or open line which is telling us that somewhere between the ground and north coil finish (green) we have an open-circuit. Unfortunately, due to the construction of this Bill Lawrence pickup, we can’t inspect the coil to check for possible repair so I’m afraid this pickup is toast!

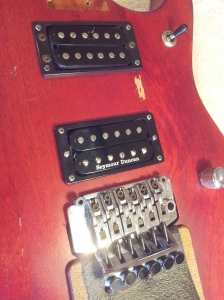
After some discussion with Nick regarding a replacement pickup for this guitar we came to the conclusion that a Seymour Duncan Custom Trembucker would be just the thing! Obviously a like-for-like Bill Lawrence would have been better but, after some research, it would appear that modern BL pickups are..how should i say this..not what they used to be ( this opinion is based only on what i have read from others experience!)

Fast forward to the arrival of the new pickup and it’s time to get re-wiring! At least i thought it was before discovering that the pickup ring for the BL pickup is too small for the chubby bobbins on the new Duncan pup….modification required!….

N2-31

…after filing the excess material from the pickup ring and smoothing with sandpaper the new pickup is mounted, new push/pull pot is mounted and selector switch is fitted… re-wiring begins!

N2-52

Now, the secret to good wiring is not just soldering technique….don’t get me wrong soldering the correct way is of HUGE importance but the real key is….PLANNING!

Before firing up the old melting stick we sit down and figure out things like; where all conductors will run in the shortest lengths with the least strain, where all our grounding points will be i.e all common to one pot, shared between pots or common to a ground plate and what our heat requirement is for each part of the circuit i.e lots of heat for attaching grounds to the rear of pots and not so much for pot/switch tabs.

When i wire guitar electrics i want the entire system to be functional, neat and able to withstand shock/movement:

N2-44

N2-43

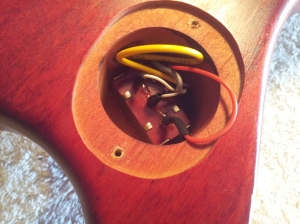
As you can see from the photos, all connections have relief loops which are little loops of excess wire immediately before the connection. These then act as little springs to prevent strain on the connection. All grounding points are neat with no “splayed” screening, insulation is cut neatly to where it is needed and protected from peeling with heat shrink tubing where necessary, solder connections are neat, without excess solder and finished with heat shrink tubing, where necessary, to reduce the possibility of shorts. Excluding component failure, this electrical system should last forever!

Now that the wiring is complete and the system tests ok it’s on to the setup…

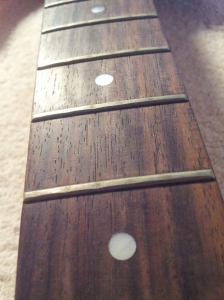
Right, we know from our initial inspection of the guitar that the frets on the N2 have seen some action, as such, little “divots” have been worn into the fret surface by the strings causing buzzing, inaccurate intonation and uneven pitch when bending. When this is the case we need to work out if all frets need replacing, some frets need replacing, all frets need levelling or all frets just need polishing. In this guitar’s case the frets are evenly worn the entire length of the neck so partial fret replacement is out of the question and although the frets are pretty low there is enough fret left to level and re-crown. So this job will require levelling,dressing, crowning and polishing. If the wear spots were really pronounced and deep we would be leveling with a course-cut leveling file but here the wear spots are fairly shallow so we can leave the super-butch file out of it and go ahead and level frets with the fret beam.

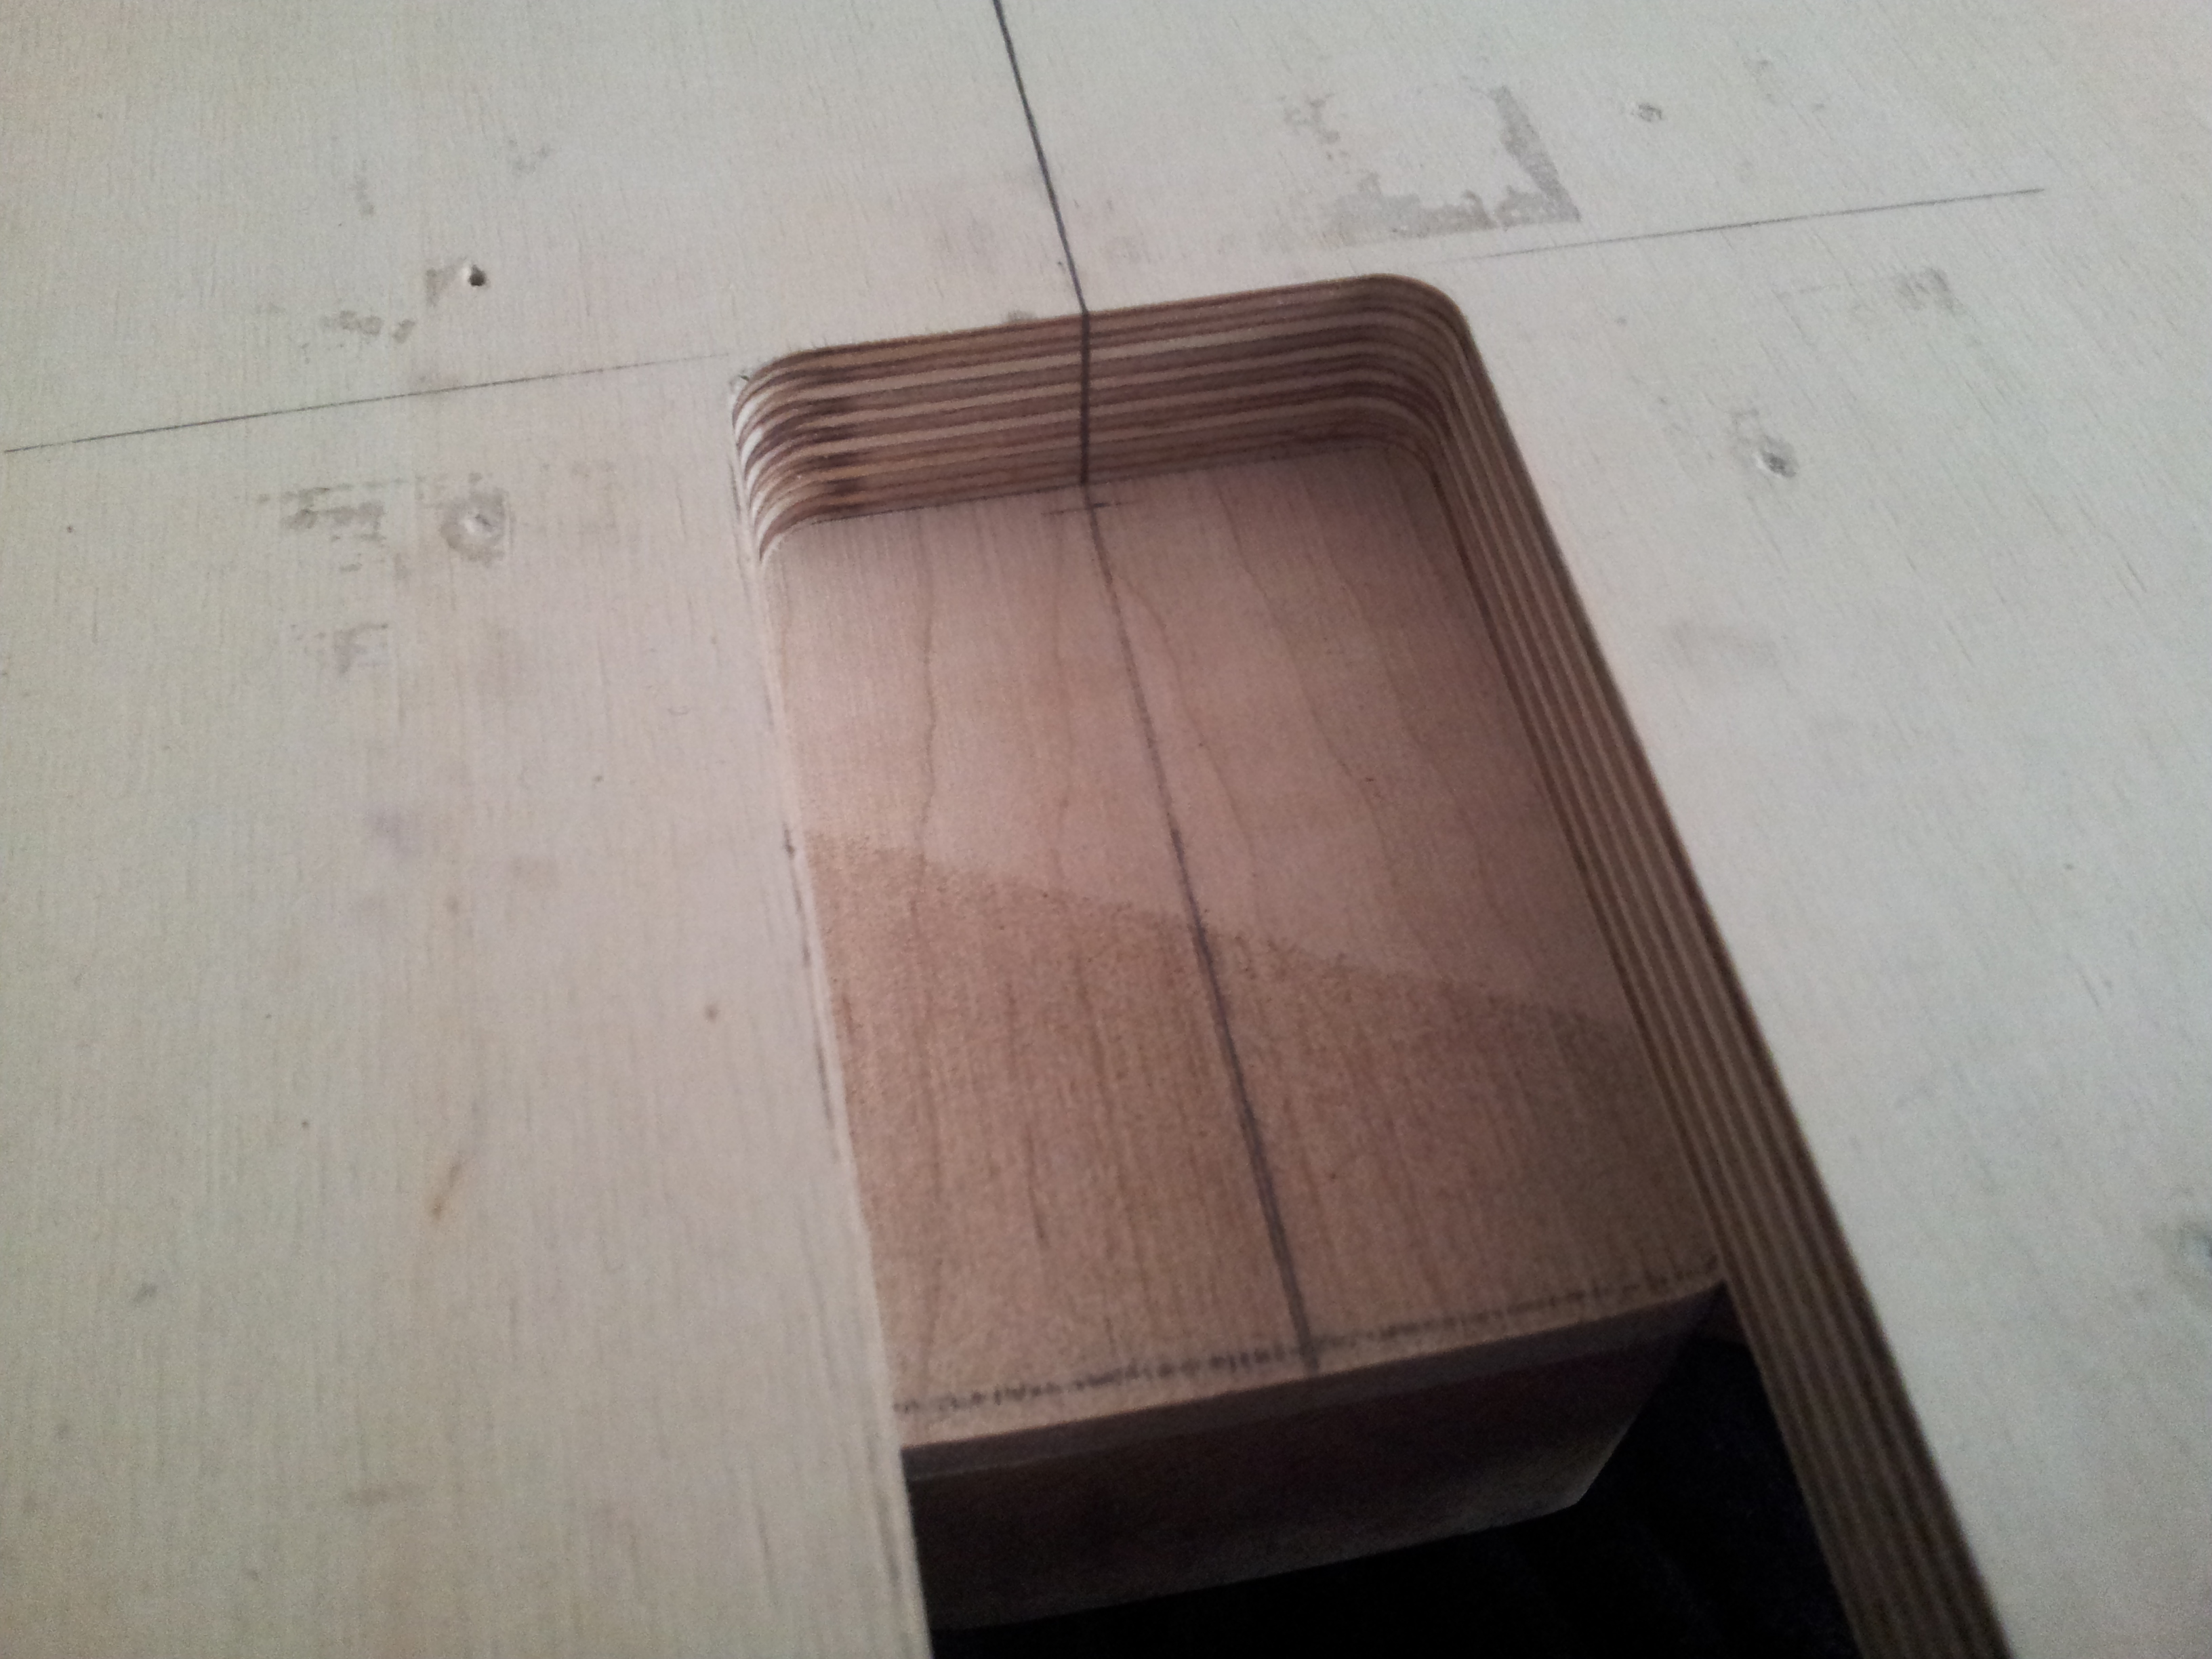
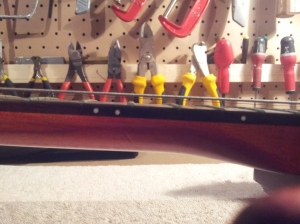
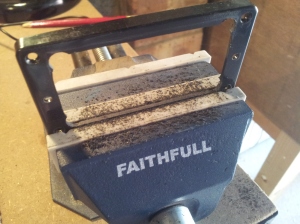
First things first it’s waaaay easier to perform fret work with the neck removed from the body so some decapitation is in order…

N2-18

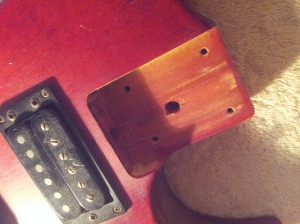
…nothing out of the ordinary in here….nice!

N2-20

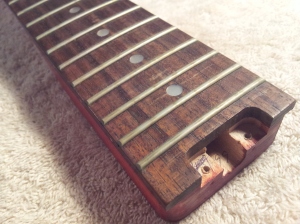
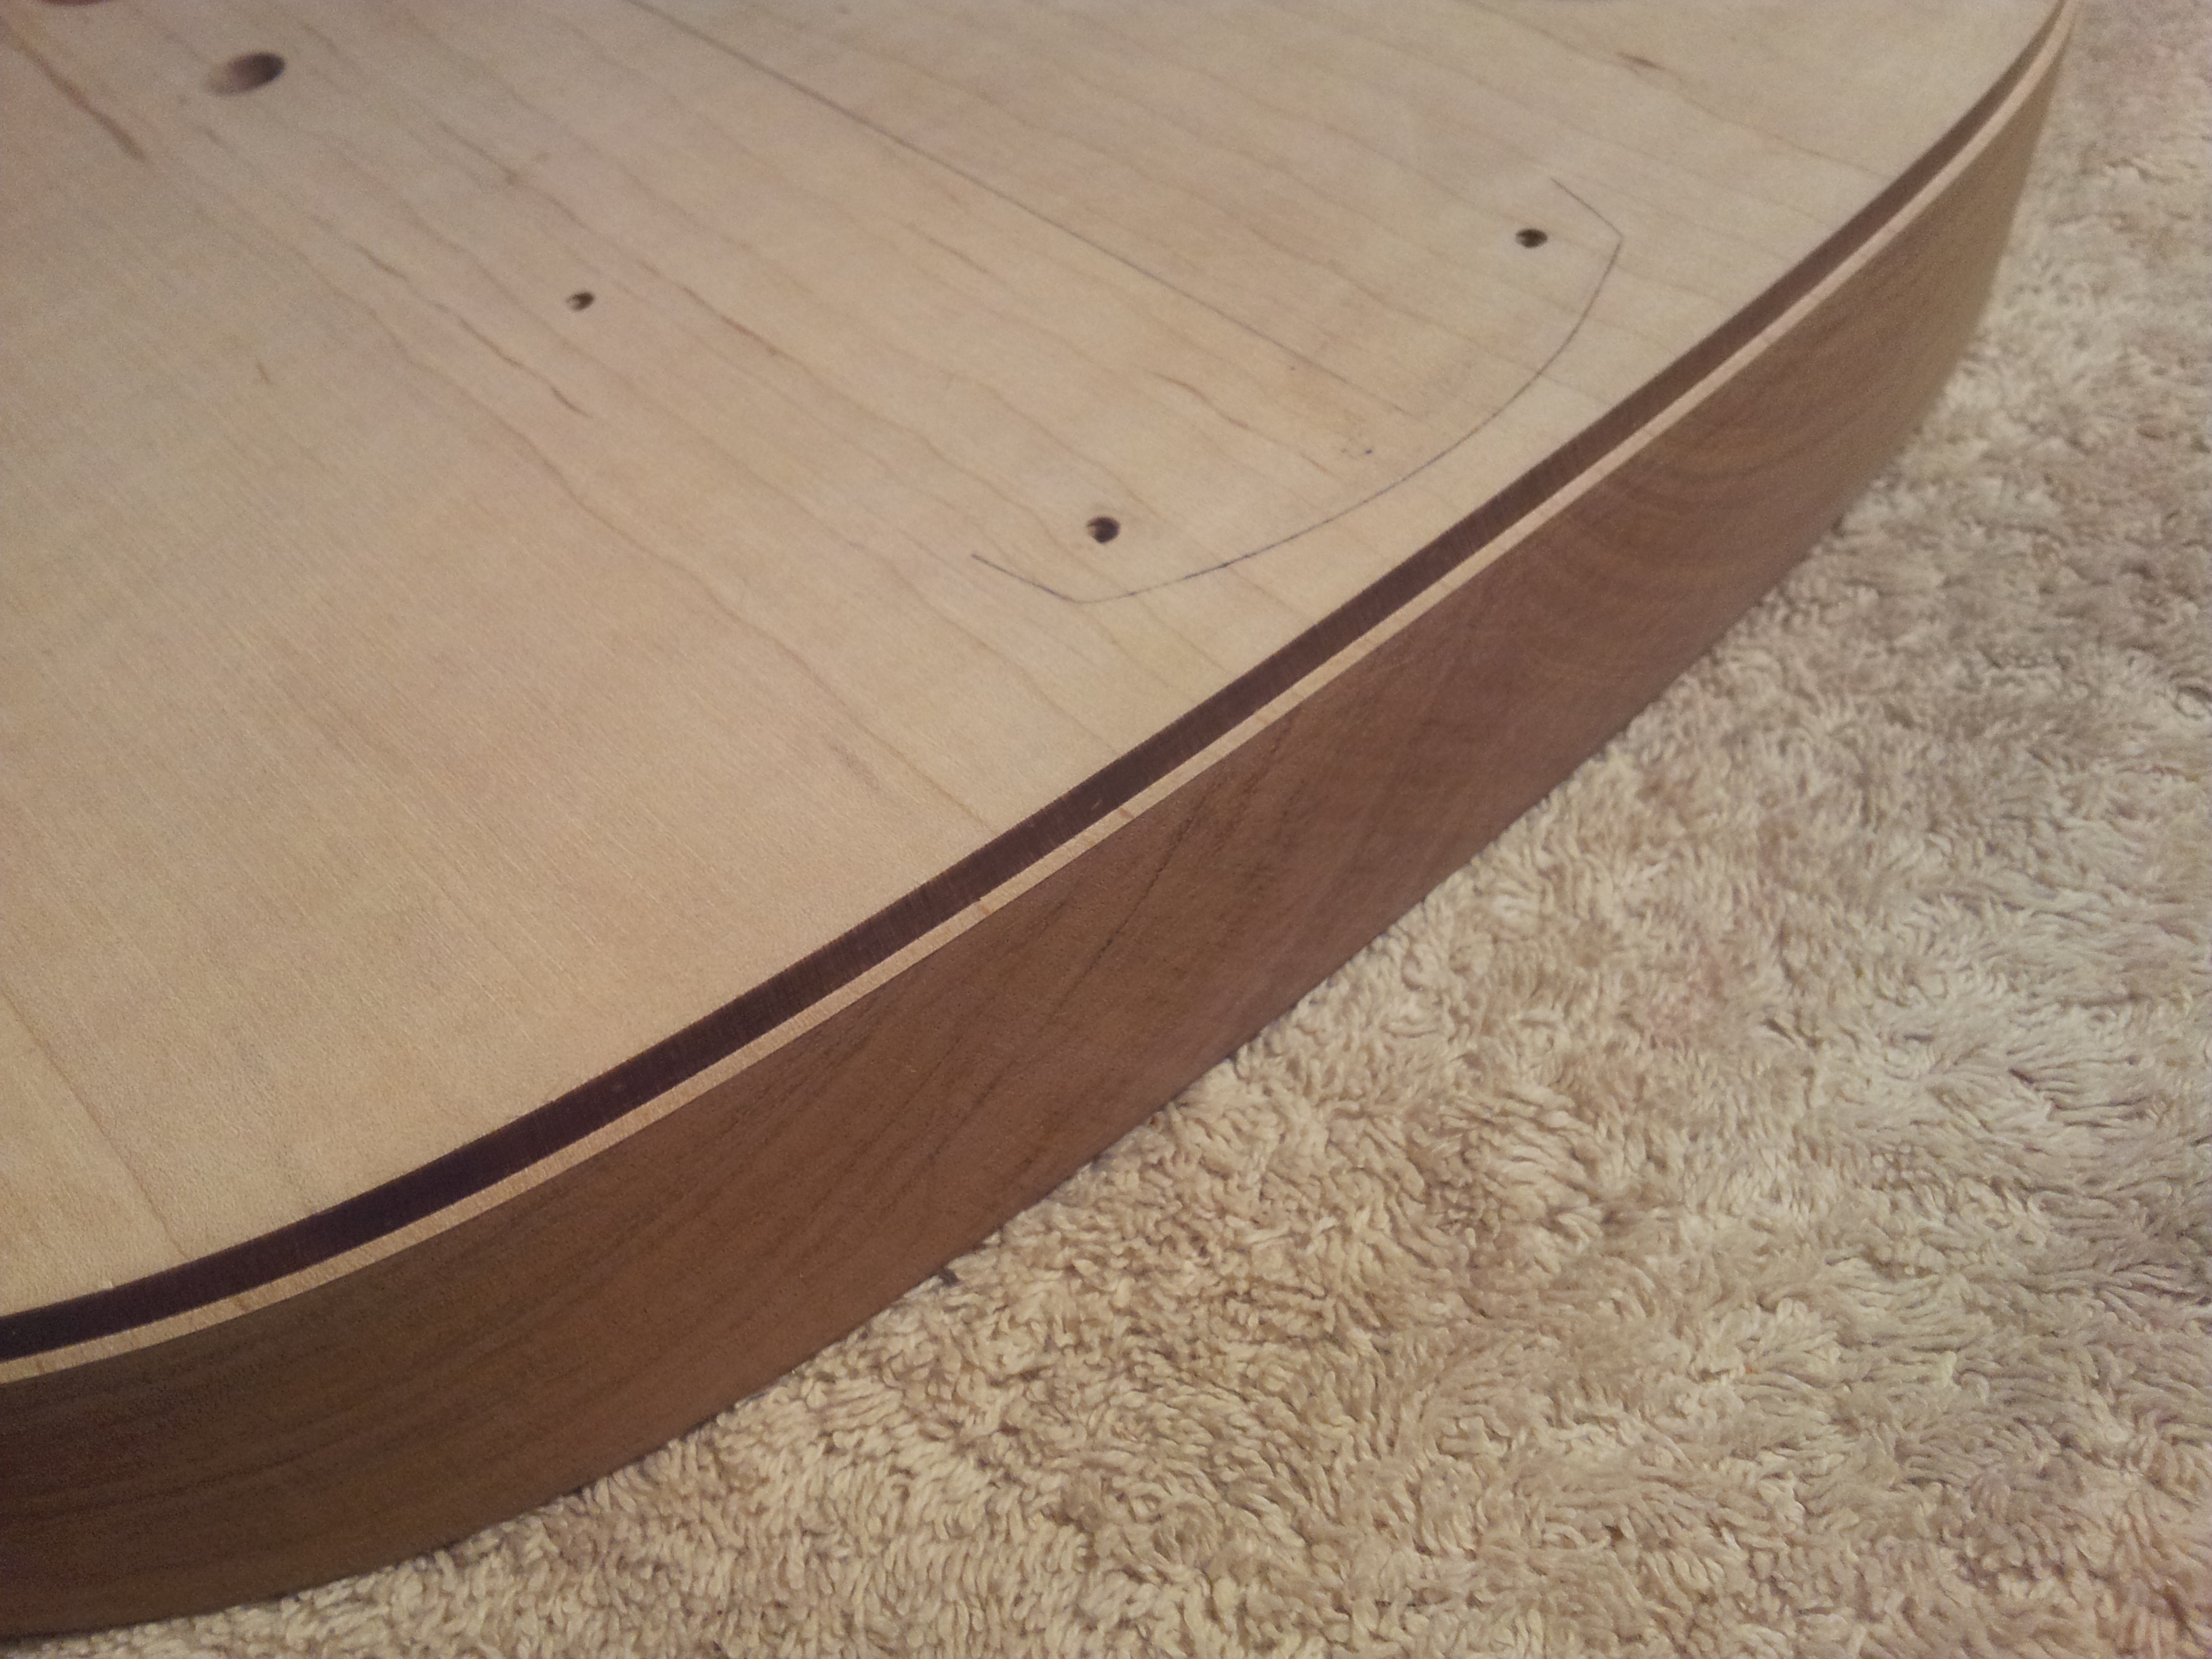
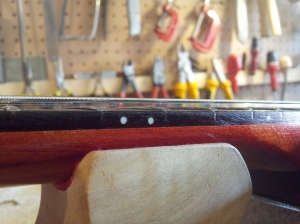
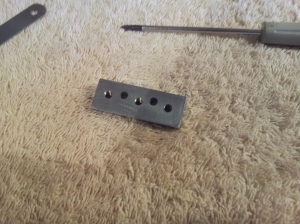
…and here’s the business end of the neck! Once we pop the cap off of the heel end we reveal the truss rod recess so we can access the truss rod nut.

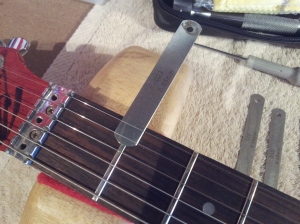
Since we want the frets to be level WITH the fretboard we need to get the neck as straight as possible before leveling can begin. We do this using an appropriate truss rod key and a notched straight-edge (this useful tool is and engineers straight-edge with notches cut into it at the fret intervals so the edge can sit on the fret board NOT the frets!) and the truss rod is adjusted until the neck is arrow straight ( for reference see WTF Neck Relief )

Once we are happy the neck is dead straight we need to support it as we level so as to not introduce flex in the neck as we apply pressure, if this was to happen we would end up grinding more material away from the centre of the neck than the ends….not good!

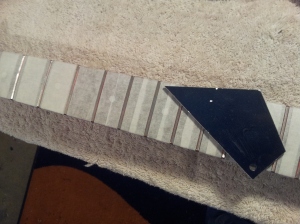
We then apply masking tape to protect hardware and surfaces and mark the tops of all frets with machinists ink so we can see where and how much material is being removed.

N2-25

N2-17

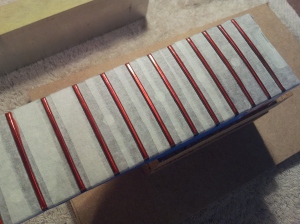
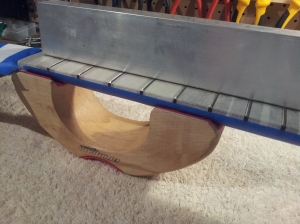
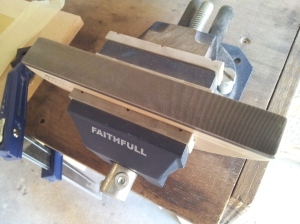
My leveling beam is a length of  steel box-section which has two opposing machine-straight surfaces. It is filled with rice so it will take material away under its own weight, when we apply pressure to an object it is very difficult to maintain consistent pressure throughout a stroke so we see inconsistencies in material removal. With the neck firmly supported we make gentle, full length strokes, in-line with the neck perfectly perpendicular to the frets and we check our progress with every group of passes from one side of the neck to the other…

N2-26

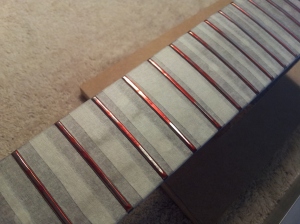
…as you can see,after a few passes with the beam we see the material being removed from the high spots of the frets ( shiny spots ) and the low spots ( still marked with ink ) yet to be leveled. The low spots seen here are typical of a guitar played in all positions so there is wear all over the fretboard, here we see some low spots in the central “solo” area of the fretboard. We continue with lateral passes, moving from one side of the neck to the other and back again, each time checking progress, until we see no more inked low spots. Just as i break through the last low spot i usually switch to a radius block with 240 grit paper attached just to sure up any radius imperfections on the outer edges of the frets.

N2-21

Once we have evened out the wear spots we go through and check each fret with a fret rocker to catch any low or high buggers, we check the whole length of each fret starting at the treble side and moving to the bass side at the six string intervals. Once we are happy everything is level we can give the frets a clean.

N2-22

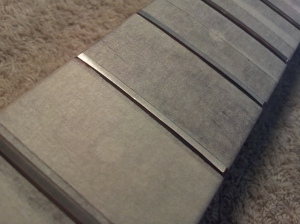
Here you can see a freshly leveled fret. Notice how we are left with a big ugly flat spot right on top of the fret…not very pretty looking and certainly not very good for intonation as the underside of the string will be contacting a huge surface area of fret rather than a nice clean “crown” on the very tip of the fret.

So, now we need to do some crowning. Crowning is basically rounding these flat spots over into a gentle curve. I do this using a three-sided fret dressing file, working one side then the other gently rolling over the flat edges to a smooth “crown”. This technique takes time…lots of time but the end result is a super smooth, gorgeous looking fret with pin-point intonation.

Once a crown is established on every fret we can really start to clean em up! I have a big wad of very dense foam in my workshop that i wrap with varying grades of wet/dry paper to slowly polish frets back to a high sheen. I start with 400 grit and concentrate on each fret making sure i rub out any scratches left by the beam or dressing file then i move through 600, 800, 1000, 1200, 1500 and 2000 grit papers, each time taking out the scratches left by the previous grade. By the time we hit the 2000 grit the frets are perfectly smooth but matt and dull. At this point i move to super fine wire-wool, polishing each fret for 30-60 seconds to bring up a sheen. After this stage the frets are looking pretty good but to add super-sheen i dab on a little chrome polishing compound and really work up some heat on them til they shine like hot-rod chrome!

N2-33

N2-32

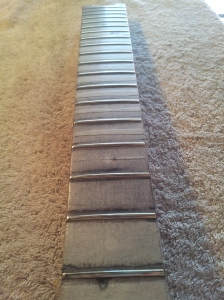
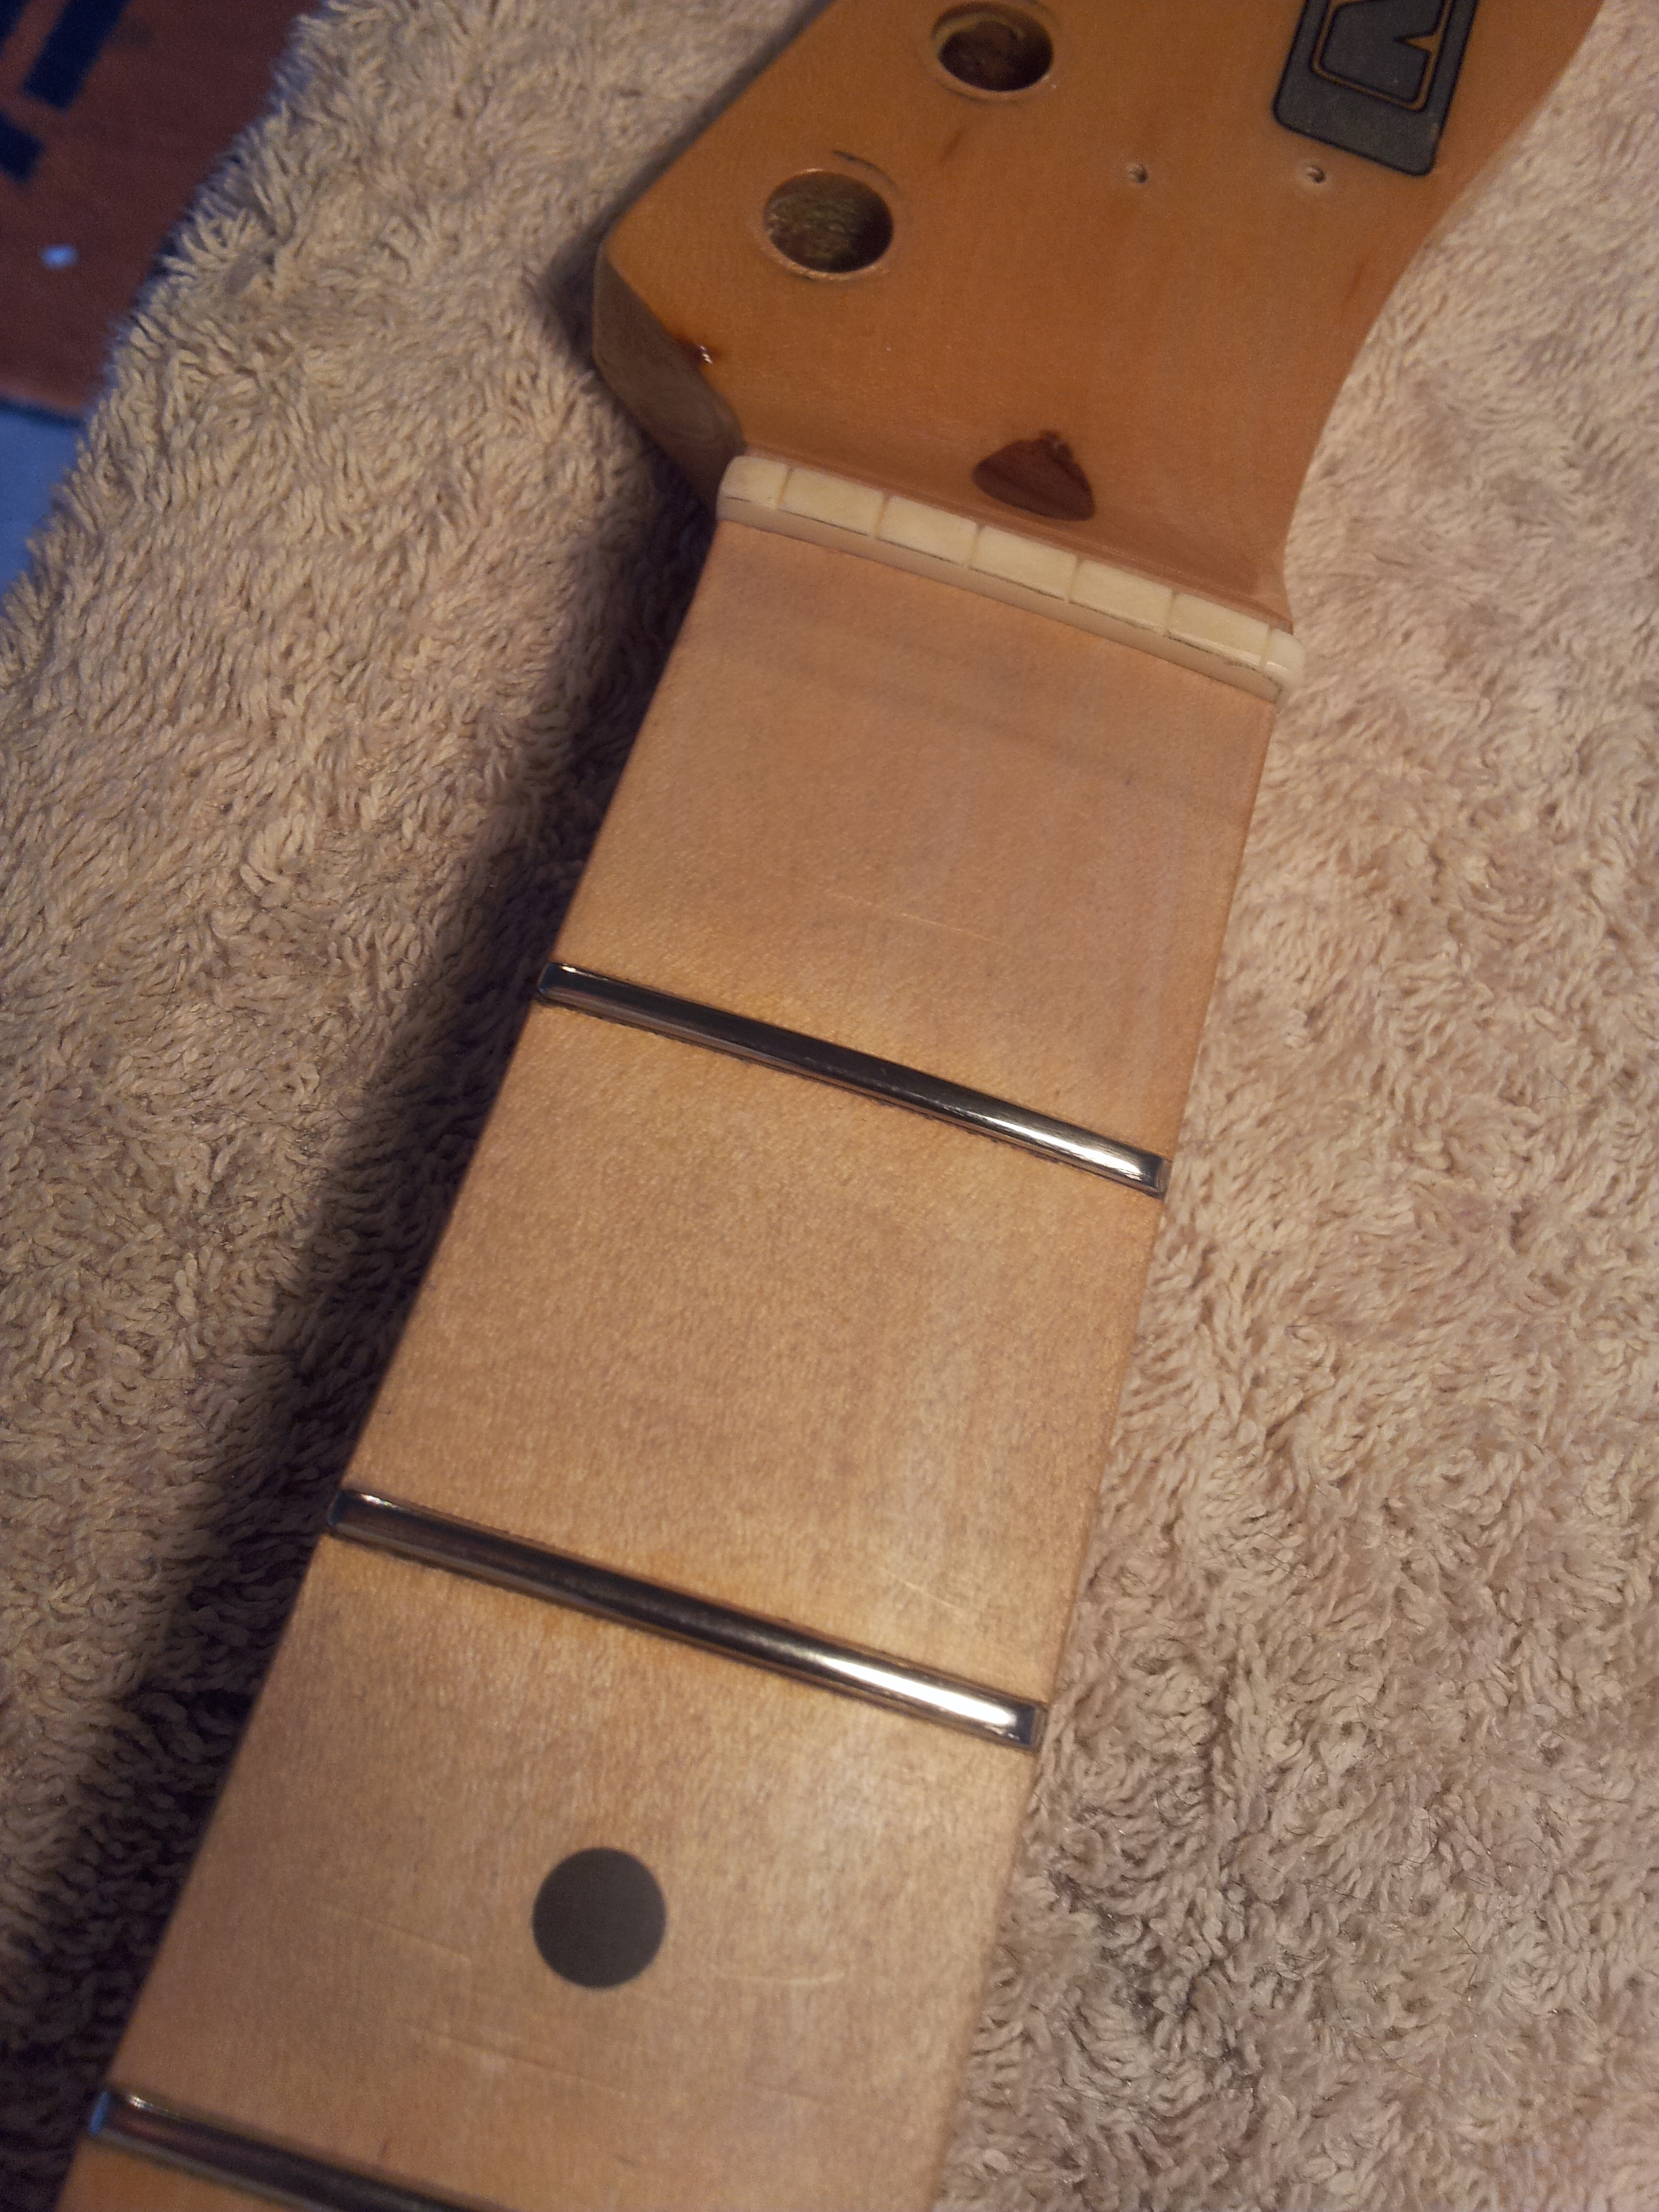
…and we have frets again! From worn out looking, dull and pitted frets we have produced super smooth, slick, shiny frets with accurate crowns….lovely!

So, now that’s out-of-the-way we can turn our attention to doing some setup work! After CAREFULLY removing the masking tape (even masking tape can pull finish off of a guitar neck so pull diagonally and wiggle rather than rip!) we clean any remaining polishing compound and goo off with some mineral spirit on a rag and then rub in a DROP of linseed oil to seal the open grain of the rosewood ( only a drop here people, you don’t want to let excess oil penetrate the fret slots. Loose frets with fret slots saturated with oil are almost impossible to treat!).

Once we are happy that the frets and board are nice and healthy we can re-attach the neck.

N2-23

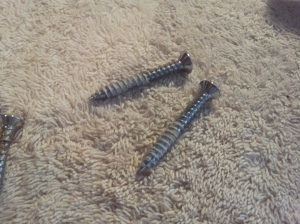
When re-attaching the neck i use Fender’s old trick of rubbing paraffin wax onto the screw threads. This wax not only acts as a thick lubricant it also seals the wood threads against moisture which will reduce the risk of swelling around the neck joint. I do this to any wood screw i remove on a guitar but neck screws are super important!

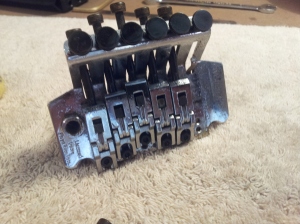
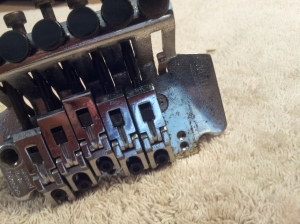
Once the neck is attached and aligned correctly with the neck pocket we can start looking at the tremolo system. This guitar is fitted with a licensed Floyd Rose system, a very well-engineered unit which is superbly accurate when set correctly and next to useless when not. To get it performing properly we need to remove the entire assembly for cleaning and service.

N2-14

To remove the trem block we first need to carefully remove the springs from sustain block and claw. As you can see above..the correct amount of springs are there but arranged incorrectly! It is extremely common to see three springs arranged like this on a block but i do not like it. Surely, in a finely balanced, sprung-loaded system it makes sense that ALL counterbalance strings are at the same tension at all times?…clearly this can not be the case in this arrangement as the centre spring has less tension due to its shorter travel. Some people will tell me I’m being pedantic and the “splayed” pattern looks better but i like to go with physics here, if you can’t get the springs straight with your chubby fingers then hard luck but that’s how i think they should be!

N2-35

N2-28

Once the trem block is carefully removed from the guitar i can begin taking each intonation piece off one at a time, removing the intonation screw, string clamp screw and clamp block. I then clean every part using WD40 cleaning oil making sure to remove any rust/oxidation with micro mesh polishing paper.

N2-24

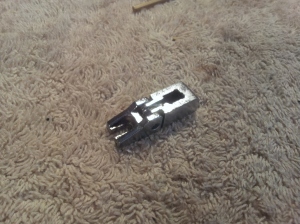
When all parts are clean of rust, debris and DNA the unit is reassembled and all intonation pieces are moved BACK as far as they can go so we can sneak-up on our intonation points later.

Before we re-attach the trem block to the guitar this is a good time to inspect the bridge inserts and trem knife-edges for wear. A Floyd Rose system requires that the bridge floats perfectly on a fulcrum set by knife-edges on the bridge base interlocking with complimentary beveled bridge posts. If the knife-edges or post bevels are rusty, worn or chipped in any way then the bridge will not ride correctly and return to the same point. Upon inspection both the post bevels and knife-edges show no sign of wear but a tiny build-up of oxidation… a little rub down with fine grade wet/dry and a small application of vaseline as lubricant does the trick. Now the bridge assembly can be carefully re-located in the bridge posts and the springs can be reattached at the back being careful not to “shunt” the bridge into the posts, chipping the knife-edges!

Now we are ready to attempt what a lot of people get wrong….to balance a Floyd Rose system!

First we need to string-up so the strings are JUST taught, certainly not up to concert pitch. With the strings just taught we need to screw the spring claw out so it’s nearly at its maximum travel. We then use a wooden wedge behind the sustain block to shim the bridge until it is completely level with the plane of the body…

N2-39


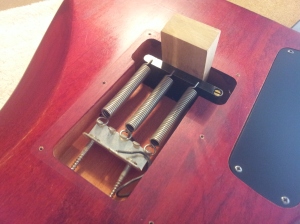
You can see in this picture that the springs have been arranged in, what i think is, the correct pattern and the claw has been screwed out to just over an inch. My trem blocker is a piece of solid mahogany cut into a wedge that tapers from about an inch to half an inch. It’s imperative that a trem block be of hard wood so no compression can allow the bridge to move. When the bridge is shimmed so that it is level with the plane of the body this is its balanced position and every adjustment can now be made to the guitar (save for final intonation) without changing this balanced position….it is now “locked”!

We now need to look at the playing action and adjust where necessary. Since we know that the nut height needs adjusting but we don’t want to do that yet we need to take this extra height out of the equation for the bridge height, we do this using Fender’s good old-fashioned trick of using a capo at the first fret to give us a “zero” reading from the first position. The neck is still arrow straight from the leveling process which is the perfect starting point here as gradual string tension increase should pull just enough relief into the neck. Using my engineers 6″ rule i set the low E height at the 17th fret to 4/64″ and the treble E to 4/64″…

N2-54

…a good starting point for most strat-style guitars. It is worth pointing out that string action needs to be measured with strings at full tension as this pulling force will kick the neck up a little but. It is also good practice to slacken the strings off before adjusting the bridge height posts so as not to mar the knife-edges or post bevels…it’s a pain in the arse but like i said BEST POSSIBLE PRACTICE! At this point we can check the bridge radius. Unlike Fender style guitars we cannot easily adjust individual saddle height to correct bridge radius, instead low saddles are stepped using thin steel shims. In the case of this guitar one of the centre saddles (G) has been replaced at some point and is much taller than the others. Now in this case we could shim all the other saddles up to the same height but i like to have the fewest amount of shims as possible to maintain good mechanical coupling between saddle and sustain block at all times, so in this case i need to take the saddle off and grind it down to the same height as its corresponding saddle (D) These saddles should be at exactly the same height as they form the crest of the bridge radius. To grind Floyd saddles down a little i use an old fret leveling file upturned in a vice to get a nice dead flat bottom on the saddle…

N2-46

…and then a piece of fine grit sand paper taped to a flat tile to give the bottom a smooth finish…

N2-30

…once the saddle has been ground to the correct height we can then shim the other saddles where necessary to correct the radius. We check the bridge radius using a curved radius gauge underneath the string spread. We can make a second check (as the bridge is set at the same height bass to treble) using the 6″ rule and measuring each string to fret top at the 12th…all readings should be the same at this point.


Now we have corrected the string radius to match the fretboard we need to turn our attention to the nut height…

N2-40

…we already know that the nut was too high at the start of this journey and now we have taken a couple of thousands off the top of the frets we know we are going to be even higher. Now, if this was a guitar with a bone or plastic nut we would use nut cutting files to lower each slot to the required height…easy peazy….but this is not that kind of guitar! Guitars equipped with Floyd style trems have locking steel nuts with PRE-CUT NON-ADJUSTABLE string slots so in this case the entire nut has to be moved up or down to compensate. From factory these guitars have a veriaty of shims installed under the nut, these shims are then removed as the frets are dressed over time to compensate for the reduction in fret height. This guitar however has no shims left, the nut is sitting right on the nut shelf which is routed in to the fretboard.

There are arguments for different methods of adjusting the nut in these circumstances. Some will say take some material off the shelf and leave the nut alone but i prefer to modify the nut by grinding its base to make necessary adjustment. This way if you f*** anything up you can replace the nut or shim it, if you f*** the neck up then that’s going to be a tough conversation to have with your customer! In this case the nut shelf on this guitar is very thin and i would run the risk of routing right through the fingerboard and into the neck. So with all this in mind it’s time to grind the bottom of the nut.

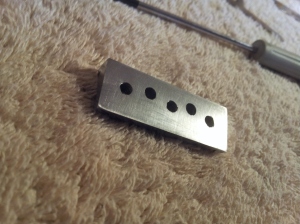
The nut itself is machined steel which is chrome plated. In most cases it will only be necessary to knock the plating off and tickle some of the steel so i use the same upturned file i used to grind the saddle to grind the nut. Between strokes on the file i return the nut to the guitar to measure my progress until perfect.

N2-36


N2-29

Once the nut is seated at the correct height we are getting closer to where we want to be! Now we can tune up to pitch and check our playing action again as this may have moved slightly and we are measuring without our zero fret capo now. The guitar plays pretty good at this action setting but i feel a guitar like this with a dead level fret job could go lower, plus, i know Nick like a slinky feeling playing action so string height is dropped to 4/64″ and 3/64″ on the bass and treble sides respectively. A quick check of the neck relief shows a nice comfortable 0.004″ almost straight with a hair of breathing room…perfect!

Now we have our string action set we can go ahead and “rough in” the intonation, i say rough-in because remember we are “locked” and not floating yet! Now, when we assembled the saddles before we left them all at their furthest back position, this is a good idea because we want to sneak forward to our intonation spot not back, this way any kinks in the string are left BEHIND the string’s speaking length not within it! I explain the intonation process in detail in the WTF section so wont need to go into it here but for this job we use a strobe tuner, a 2.5mm hex key and a whole lot of patience because we measure, de-tune, reposition saddle, tune up, measure, de-tune, reposition saddle, measure…rinse and repeat until correct!

Once the intonation is set it’s time to float the boat….errrr bridge! With strings tuned to pitch and a quick check to make sure the bridge is still parallel to the body we wind in the spring claw screws bit by bit, 1/8th of a turn at a time SLOWLY until the block just gently slips out and booooom…in theory your bridge should be floating in its correct position!! Be warned though…things WILL have moved slightly so we have to re-check EVERYTHING and adjust where necessary. More than likely your string action wont have changed but you will need to re-check intonation because you can bet that has!

After re-tweaking the intonation and checking and re-checking your other measurements it’s time to play!!

So, as i say in the WTF section setup is about FEEL, you can’t go on measurements alone, a rule and feeler gauges can get you in the ball park but your hands will tell you when your finding the guitar’s “spot”, every guitar has got a “spot” and they’re all different…you just have to find it!

When we are happy with how the guitar feels we set the pickup height. Again much like the guitar’s feel, pickups have their spot, measurements get us close and we use our ears to guide us home. In general i set both pickups to 1/8″ from the string bottom with the strings held down at the last fret then…i listen! I listen for wolf tones from the bridge pickup, these are notes caused by the pickup’s magnetic field interfering with the elliptical vibration pattern of the string, if these wolf tones are present we back the pickup off and balance between bass and treble sides. Then i back off the neck pickup until it is just a touch lower in volume than the neck  adjusting bass to treble balance here also.

When we are done here the guitar is given a final clean, polish and playability check and she’s good to go!!!


I’m pleased to say Nick is very happy with the results of this setup and it’s just that kind of feedback that keeps me doing what i do…making guitars better!

If you have any questions regarding this, or any other setup please leave me a comment and i will try to answer you as soon as i can!


Thanks for your time,

TFM


UPDATE OF HAPPENINGS!

Hi all!

Just a quick update to let people know that i am alive and that the lack of blog activity is down to..

A) Being super busy with guitars and the like in the workshop

B) Being in the beautiful city of Florence with my wife

and

C) Coming back to find that my image bank has been corrupted hence the photos not appearing in certain places on the blog!!!

So just to let you know i will be getting back to normal soon and bringing forth some more updates. Since my last section on refretting was posted i actually finished spraying the neck and had the pictures ready to post…..then disaster…most of my images became corrupt and i have no backups…lesson to self! So rather than stripping the neck and starting again a will post another section on the next refret i do and maybe add some more in-depth photos this time.

Anyhow that’s it for now, watch this space for a start to finish setup and an update on the guitar build!!!

TFM

NO NEED TO FRET! – RE-FRETTING A FENDER STYLE MAPLE NECK – PART 2!

So, once I got some setups out of the way, I got some time to spend with the Telecaster re-fret job.

We left off with the board clean and level with clean, straight fret slots. I also had to order some fret wire with a tang width larger than any I had in stock.

Now we can get to the nitty gritty….putting some frets in!

When a fret board is straight and level the first thing I need to do is radius and cut the fret wire to length…

FRET1

…as you can see from the photo, the fret wire is cut with a fair bit of over-hang and is given a radius slightly tighter than that of the board. This is for two reasons 1) it keeps tension across the fret to keep the fret ends down and 2) as the fret is driven into the slot, the barbs at the ends of the tang will be driven downwards AND sideways into the fret slot wall, resulting in a more secure fit. This picture shows a fret with too much radius in it though, I had to flatten it out a tad…if you radius a fret too much you run the risk of the centre of the fret popping up…not cool!!

As I cut and radius the frets one by one I store them in my little numbered fret block so I know which fret goes where…

FRET2

..I know it probably looks like overkill but if I don’t do this and get them mixed up it really will ruin my day!

After all frets are given a radius and cut to length, I will set them out in their respective slots to double-check lengths and radius. This is worth doing as you don’t want to realise you’ve made a cock-up in the middle of hammering frets in…trust me!!!

FRET3

So once I have all my frets ready, it’s time to put ’em in!!

Now, at this stage it’s worth mentioning some different methods for fitting frets. The three most common methods are hammering, pressing and gluing. These methods are not exclusive of each other however. Methods can be mixed to better suit the requirements of specific guitars. I have, at some point, used all of these methods and mixtures of them to get a job done. Sometimes it is necessary to use more than one method on different areas of the same neck.

The hammer method is the oldest and most traditional method of fretting a guitar. The fret is offered up to the slot and is driven in by a few precision “dead” blows of a fretting hammer. The fret is held in place by the interference fit of the tang and its barbs against the wall of the fret slot. The exact level of interference is determined by the tech/luthier to influence bow in the neck….this is compression fretting as mentioned previously.

The pressing method is similar to the hammering method except the fret is “pushed” into interference using a machine press fitted with a concave caul that matches the radius of the fretboard.

The gluing method involves using a slightly undersized tang or widening the fret slot so the fret can be pushed into its slot by hand. Glue is applied to the fret slot or run across the tang and the fret is clamped in position until dry.

It’s worth noting that for a brief period of time Fender used a method to fit frets where the wire was driven into the slot from the side using a shuttle on a pulley. To my knowledge no manufacturer is using this method anymore. However if I do a re-fret on a guitar from this period I will always remove the frets sideways as removing them from the top will tear the board to shreds!

Of the all the methods mentioned above I prefer to use the hammer and glue methods, often mixing both together depending on the job. I don’t really like the pressing method as I feel you lose some of the control you have using your hands to feel the feedback of the neck. I’ve seen people use the press to great effect and it does work….I just don’t like it.

On this particular re-fret we know we have nice big fret slots and we know I now have wire with a matching tang, so for this job I will use a hammer to seat the frets and sure things up with a drop of glue.

Over the years luthiers and techs have been arguing about the use of glue in fret slots. I think it is perfectly fine. Not only does the glue make sure the fret does not pop up in the future, and trust me they can, it also fills air gaps in the fret slot making for a more positive mechanical contact for the fret. This positive contact actually helps sustain and reduces dead spots in the neck. Removal is no problem as the fret is always heated,breaking any glue bond. Be aware that we are not glueing the metal to the wood, we are using the glue to reduce any clearance inside the fret slot giving it a nice snug fit and no way to wobble or spring out.

Once I’ve offered up the fret to the slot I hold it in place with one hand and make one light strike on one end followed by a sharp, slightly harder dead blow to seat it. Then I do the same to the opposite side. I then do the same dead centre and finish with six light dead blows along the  length of the fret at all string positions…

FRET4

I do the same in every fret position, stopping only to check that the fret is correctly seated…not proud of the board and not “sunk” into the fretboard.

Once I am happy that all frets are seated correctly, i clamp the neck very lightly, side up and add 2-3 drops of water-thin cyanoacrylate(CA) super glue into the end of the fret slot using the protruding fret-end as a drip feeding wick. I let the neck sit for 30 seconds then spin it and do the same to the other side, again leaving it for 30 seconds or more….you really don’t want CA to run out of the slot and onto the finish….you will be doing a lot of scraping, filing, sanding and polishing! As we are relying on capillary action to “suck” the glue into the fret slot,some glue will naturally want to run down the side of the fret bead across the fretboard…no big problem there, we just need to tidy that up before we say we are done!

Time for a cup of tea/coffee while the glue cures and the neck settles down!

Once I’m happy the glue is cured (most CA’s cure in 30-60 seconds) and the neck has settled, it’s time to sort out the fret ends.

When cutting back the fret ends before dressing, we need to use pretty butch cutters for the job. Fret wire is, generally, very soft nickel/silver so it can be cut with standard electrical side cutters, but, if you struggle or stall during a cut you risk bending the fret or wiggling it out of position. For this task we need to make one quick, economical “snip”. When we cut the fret we do it as close to the board without marking at and in a downward motion, away from the fretboard surface so as to not pull the fret out at its end.You have seated and glued the frets, if you distort them in any way now you are in a whole world of pain! So for this job I have a dedicated pair of industrial cantilever cutters…..tug, snip, done, tug, snip…

FRET5


…..now the frets are seated and glued we need to cut the frets back to the width of the neck. There are a few ways of doing this but here’s how I do it…

I put the neck in my soft-jaw vice with the fretboard facing me and take my medium cut engineers bastard file and GENTLY start filing each fret-end at a time ON THE FORWARD STROKE ONLY! This is because A) the file only cuts on the push stroke anyway and B) if i pull at the fret with the file I could bend the end slightly causing it to become unseated…not good!

I keep going, carefully, until i am flush with the fretboard edge, sometimes, as I’m approaching flush I switch to a fine double-cut file to feather the fret-end right up to the edge of the board…

FRET6

…once the frets are completely flush with the fretboard it means the fret ends are now at sharp right angles to it….not very comfortable to play on! So it’s time to add a bevel to the edge of the frets.

Different manufacturers, luthiers and techs have differing ways of doing this. Some manufacturers like Gibson bevel the edge of their frets at a very acute angle with steep “shoulders”. Fender guitars have a far more relaxed bevel and very soft “shoulders”

The angle of bevel can be anything you like really but somewhere between 30 and 45 degrees is the accepted “norm”.

You can buy files which have wood or nylon “runners” with mill files embedded in them to give you a uniform bevel along the board but here’s my thinking…

If you want to give different boards different bevel angles you need to buy more than one of these ridiculously expensive files and if you can’t put a uniform bevel into frets by hand then you are really going to struggle with fret dressing! A craftsman uses his hands and his skill!

I have a very fine-cut mill file set into a wooden handle that I use to bevel frets. I simply offer the file up to the fretboard edge, tilt it to my desired bevel angle then use my left hand and my right hand fingers as “rails” feeling the neck as I file to keep the bevel angle uniform. That’s how it was done back in the day and that’s how I like it done!

FRET7

…you can see that this fret has been beveled now, the file obviously leaves a pretty raw bevel so this will need to be “softened” to make playing more comfortable…this is fret dressing.

The first step of dressing the fret is to “knock away” the sharp right angle at the base of the  fret bead left by levelling/beveling the ends. To do this i use a fine-cut four-sided file with one side ground “safe”. This side rests on the board and the file is rolled around both edges of the fret bead to knock away that horrible right angle and leave a nice, rounded  fret end.

(NOTE – At this point we would apply at least a sealer coat of lacquer to the fretboard if not the entire lacquer finish. However i thought i would go ahead and show the dressing, leveling and crowning process in one hit. I will shoot the board with lacquer in the next post then re-crown/polish frets where necessary.)

Due to the slight inconsistencies of the extruded fret wire and the fact that some frets can seat very slightly lower than others we have to do some leveling…usually not a lot but it needs to be done so we know we are spot on!

Since all work has been carried out methodically and accurately we know we wont need to hump off a lot of metal so, usually, we can just “kiss” the fret tops with some sand paper on a radius block or leveling beam if we were working on a compound radius…

FRET11

I tape off the fretboard and run the radius block the entire length of the board with a few passes and stop to see how level the frets are using an engineers straight-edge and a fret-rocker. Once i am happy that we are level along the entire length of the board it’s at this point we might think about adding “fall-away” to the frets.

To explain the point of “fall-away” we need to know something about guitar necks. Long, solid objects, such as guitar necks don’t tend to change much along their length providing they are not put under any stress or pressure from a source outside of their own construction. When a guitar neck is glued or bolted to a body compressive forces act on the body-join area of the neck. This compressive force can “bulge” a neck at the body join position causing a slight rise in the fret board. This bulge can stay in the neck even when there is no string tension and when the neck is removed. This can be taken out of the board when we level the surface of the board but it doesn’t hurt to add some measure to stop notes “fretting-ou” in the future when string tension is applied and the neck settles. Fall-away is slightly tapering the frets from the body join fret (14th-ish) to the last fret. The disparity from the 14th fret to the last only needs to be a few thousands of an inch to make an appreciable difference and a slightly raised action from 14th to last fret is not felt.

One way i add fall-away is by shimming the 14th fret with several layers of tape so that a leveling beam will rest on this raised area adding a taper to the frets in the upper register. Half of the levelling beam is covered with tape to stop it eating into the taped shim-stock and the beam is run over these frets with a couple of passes. Progress can be checked with a straight edge and some feeler gauges…

FRET10

…as you can see from the photo I have added machinists ink to the top of the frets so I can see how much material is being removed as I level and add fall-away.

Once we are happy that we are all level I give the frets a polish using 400/600/800/1000 and 1200 grit papers…we’re not done yet but the polished surface makes the next task a little easier.

The leveling process has left us with slight flat spots on our fret tops. These flat areas not only increase drag on the underside of the string, making bending feel “gritty” but the large contact area with the string makes intonation less accurate. We need to establish a fine point of contact at the top of the fret for the string…we call this the crown…so this is fret crowning.

There are a few ways to approach re-crowning frets, most methods fall into two catagories…crowning using a purpose made,concave file and hand crowning using a straight file.

The concave files are just that, file handles with file burrs that are concave to suit the desired crown or fret size. These usually come in two different types, coarse cut toothed files and multi directional cut diamond files.These files usually have interchangeable burrs to suit different fret wire types. These files eat into the fret top and wear the corners of the flat spots into sloped shoulders until a crown is present.

Hand crowning employs a flat file, usually a three side file with corners ground safe. The file is gently pushed along the length of the fret and rolled-over at the same time. This process is carried out on both sides of the fret, switching every so often to roll the fret shoulders to centre.

Although I do own, and occasionally use, a concave burr file i don’t like it and nearly all of my fret work is completed using the traditional hand crowning technique.

The problem with concave files is that you basically have no fine control. The file will just mindlessly “eat” the fret away at a rate determined by the cut on the file surface. You also have no control over the final crown dimension as this is governed by the radius of the file. They also tend to leave more scratches and “chatter” marks than hand filing. One of the things that really pisses me off about them is that all fret wire you ever crown HAS to fall within the dimension boundaries of three types of burrs only. Obviously this isn’t always the case and many fret wire dimensions can be outside of these burr sizes, When this happens you to eat into the shoulder of the fret with the file or bottom out at the tip of the crown meaning you have to level again as you have compromised your level surface…….infuriating!

So I’m afraid this thing sits on my work bench and only sees the light of day for rush jobs that have certain, definite fret wire sizes like tall vintage and medium jumbo..rant over!

So we keep the board taped up in case we slip, and we do all slip, and we paint the flat tops with machinists ink. As I said we gentle push the file across the side of the fret and gently roll it up the side of the fret, softly curving the shoulder of the fret sides to centre until there is a perfectly straight, razor-thin line of flat “datum” surface for the string to contact…FRET9

…this is a long process and shouldn’t be rushed, the results, if executed correctly, will be a super smooth feeling fret with super accurate intonation.

FRET14FRET13

Once all fret tops are rounded to centre and perfectly crowned we polish, again, with 400/600/800/1000 and 1200 grit paper, then fine grade wire wool and finally automotive polishing compound to leave the fret perfectly smooth and shining like brand new caddy chrome!

At this point we are moving closer to re-finishing the fret-board but that will be part 3 of this job! I will be going through the steps for lacquering our finished board with nitrocellulose!

Stay tuned!

TFM


NO NEED TO FRET! – RE-FRETTING A FENDER STYLE MAPLE NECK – PART 1!

I haven’t updated the blog for a while….a few work commitments and a spring cleaning of my workshop took way more time than i would have liked!

I was going to add a section on frets to the WTF section but, since i have a re-fret job to do, i might as well put that up showing some nuts’nbolts and blood’n’guts before unleashing a wall of text!

Here we have a late 70’s/early 80’s Japanese Fender Telecaster copy. This beasty is very well put together, my suspicion is that it was made in the Fujigen Gakki plant some time in the later part of the 1970’s….all this aside it has some problems….

REFRET2


As you can see from the photo above this guitar’s frets are LOOOOOOOOWWWW…way too low to be considered comfortable. They don’t have any string “divots” in them so they have been worn in the right way…levelled and dressed regularly so they wear evenly but, alas, they are history…..she needs a re-fret!!!

Now, let me pre-face this section by saying….ALL GUITARS, AT SOME POINT, WILL NEED TO BE REFRETTED! This is just life. In many ways you can look at the frets in your guitar as a sort of “creative consumable”. That being said, it is a pretty big job that requires skill, knowledge, concentration and patience….lots of patience! If you care for your frets by having them dressed well and often and you don’t have a grip like a shot-putter when fretting you shouldn’t need to have re-frets very often…unless you want to change the type of fret you have in your guitar which is a whole other ball game!

It is worth noting that, like most things in life, there are many ways to skin a cat, however, with this particular cat and all other cats i look after we would like to skin it the right way. A lot of people believe that re-fretting is simply a case of ripping out the existing frets and thumping in some shiny new ones, job done…..this is not the case!

When i re-fret a guitar i know that I’m about to spill its guts all over the floor…..by this i mean take something away that has been there a long time hiding all kinds of surprises and fundamentally changing the guitars make-up!

So before we blow the dust of the sharp pointy diggy-outy tools, we need to sit down with a nice cup of Tea/Coffee (delete as applicable to your residence) and have a look at the guitar, do some measurements and do some thinking.

When considering a re-fret you want to first establish the end goal for the job…are we refretting because the existing frets are not to our liking? Are we refretting because the existing frets are poorly manufactured/installed? Are we refretting because the existing frets are worn out? Obviously in this case we are refretting because of the latter. These frets have been worn/levelled/dressed so many times that there is but a sliver of metal separating the string from the fingerboard leading to an uncomfortable feel when fretting and buzzes due to insufficient string-to-fret contact.

So our goal here is to refret because the frets are worn and replace them with nice new ones that improve both tone and playability…..nice!

The second thing we need to think about is “what frets am i going to replace them with? Now, in general, unless the customer complains of a problem encountered with their frets caused by a source outside of fret wear itself  i will try my best to choose the highest grade like-fro-like replacement wire i can source. You may wish to change the fret wire type all together but we’ll get to that later as the next process may have a bearing on our choice/options.

So we now need to think about the process of the job itself. At this point we have to have a good look at the guitar and do some measurements ( leaving the sharp pointy stabby tools in the box!). When assessing the guitar before fret removal you must assess and measure WITH STRINGS ON THE GUITAR TUNED TO PITCH!….seriously i can’t stress this point enough!! Before we start hacking the guitar up with sharp stabby cutty pokey tools we need to know how the guitar behaves WITH IT’S CURRENT FRETS and UNDER STRING TENSION  ( i realise that none of these photos show the guitar with strings but trust me, these measurements were taken!). If we don’t know then we are urinating in the wind when trying to plan the refret! Without getting bogged down in technicalities (this is NOT a how-to!) we need to assess the neck’s relief under string tension and with frets AND without string tension with frets. We do this for a number of reasons, primarily to find out how much/little the frets are adding relief or back bow due to compression. Compression fretting is a VAST subject which i will tackle in the WTF section, suffice it to say that compression fretting is the cumulative effect that interference-fit frets have on the bow of a neck..ie if you squeeze a load of metal into ONE side of the neck it will expand on ONE side…and what happens when only one side of a long object expands?…the object will bow.

So we have looked at the guitar under string tension and taken measurements for relief and we have relaxed string tension and taken measurements to see what, if any, bow is left in the neck ( we will also measure the straightness of the neck once the frets are removed so as to calculate the level of compression the old frets were providing).

Now there is one last thing to look at before the stabby cutty pokey rippy burny tools are let loose…the asthetics of the guitar!! Trust me, this is important but it comes at this stage because now we have the strings off we can take a good look…

REFRET4


It’s fair to say that some guitars are easier to refret than others but all have either aspects of their design that make the job harder or nasty surprises during the refret or both!

If you have a look at the photo above the first thing that should be noticed is that the fretboard is “finished” ie sprayed and sealed. When these necks are manufactured they are fretted and then the entire neck is sprayed with either nitrocellulose lacquer or catalyzed polymer (including the frets!!). As the frets are levelled at the factory the fret tops are “scrubbed” clean of lacquer/poly. A lot of maple necks have this finish especially old Fender necks and Fender reissue necks. It leaves us with not only the problem of removing “lacquered-in” frets but the decision to preserve the existing finish or re-finish the guitar once the fret job is complete.

Here’s my thinking on the matter: If a guitar is “vintage” or if the way it is constructed, in whatever way, adds significant value to it then i will do everything i can to preserve the existing finish. If the guitar is old enough and played enough to have been given a certain patina then i will  do my best to preserve the patina in every way. If the finish is good and the neck is straight and shows little or no wear i will preserve the finish.

So we already know that this guitar is an old(ish) copy of a Fender and, although very well-built and fairly collectible, has no significant vintage value. We can also see from the photo that as the finish has worn from the very centres between the frets it has left fillets of poly between the board and fret beads…when the frets are removed these will become little mounds of poly which will make seating new frets difficult. We can also see that there is a significant “ding” in the board. Upon inspection it is clear that this ding has thrown out some raised edges that will need smoothing before refretting. So with all this in mind it looks like this will be a re-finish.

This particular neck had a very mild back bow with no string tension but i wont know if this is a natural curvature in the neck or compression from the frets until i remove them so we grab the first of our pokey stabby sharp cutty burny tools…some flush-ground end cutters and a soldering iron.

To release a fret from a finished maple board we first need to “pair away” the lacquer, or in this case poly, from the edge of the fret with a sharp knife. Then we apply heat to the fret with a soldering iron. This helps dissolve any glue in the fret slot but it also liquifies oils in the wood that soften the wood grain and lubricate the fret tang on its way out. When the fret is sufficiently hot and before we burn anything we use the end nippers to grab the fret under its bead and slowly “pinch” it up and out of its slot,working from one end to the other…SLOWLY AND PATIENTLY TO AVOID TEAR-OUT!!!

REFRET8


As you can see in the photo i have started to remove some frets and paused on one so you can see how they, hopefully, peel up and out very gently without tearing any wood. If you look at the empty fret slot you can see the “bare” wood which shows how the frets were seated before any finish was applied. You can also see the “teeth” marks in the fret slot walls.These are marks left by the barbs in the side of the fret tang that cling to the walls of the fret slot as the fret is driven in. It looks to me like these are the original frets as fitted from the factory…pretty amazing considering this guitar is over 30 years old! The frets came out pretty easily with a little heat and some patience, the only trouble frets were ones that had been “pushed” into the finish and ones that had such slim ends it made hard work of wiggling end nippers under the fret top. No significant tear-out means either i did a great job or the frets were fitted perfectly from factory or a little of both ha ha!!

REFRET10

Here she is…naked as the day she was born!! After inspecting the general condition of the fret slots i once again turned my attention to the neck. As expected it now measures almost completely straight so we can prove that the cumulative effect of the fret tangs in one side of the neck was back bowing the neck, remove the frets and the neck pulls straight…cool eh!!

What we draw from this information is that we don’t need to “force” frets into the neck now to make up for any natural forward bow,we can choose fret wire with a tang that exactly matches the fret slots so as not to add unneeded compression. These fret slots measure 0.025″ which is pretty big….good job i don’t need to add compression as finding fret tangs bigger than that would be a problem.

Looking at the frets that have been removed gives us any clues to any surprises in the fret slot or any bad practice during fitting from factory. We can see this fret looks just as it should upon removal so no surprises as yet…

REFRET20

Now we have done the measuring, pulling and more measuring we can start to clean up the mess we’ve made…

REFRET11

Before we go grabbing some more cutty sharp stabby tools we need to grab a radius gauge and check the radius of the fretboard and its accuracy. As suspected this fretboard measures a healthy vintage style 7.25″ although it flattens out a very small amount towards the heel…not uncommon on pattern necks and no significant problem. Now we can select a cutty tool…

REFRET12

So, as the fretboard surface has a 7.25″ radius, we need to use a matching radius block to level the surface. We start with coarse grain paper to “cut” through the tough poly finish and move through progressively finer grades as we reach the bare wood, finishing with 600/800 grit to leave a smooth, accurate 7.25″ radius the entire fretboard length..

REFRET14REFRET15REFRET17


So there we are for part 1! We assessed the neck with/without string tension and with/without frets, we carefully removed them, we assessed the fret slots and cleaned and levelled the fretboard ready for shiny new frets.

As the fret slots measured in at a healthy 0.025″ and since i have no fret wire in the workshop with tang width like that i have ordered some up. When it arrives we will crack on with the next step!!!!

Stay tuned! TFM


SYNCHROCASTER GUITAR BUILD UPDATE!!!

So here we are getting to the business end of the neck of the Synchrocaster!

Rough cut headstock ready for profiling and sanding.

Rough cut headstock ready for profiling and sanding.

Rough cut headstock transition.

Rough cut headstock transition.

Rough cut headstock  transition.

Rough cut headstock transition.

Rough cut neck heel.

Rough cut neck heel.

Rough cut neck ready for profiling and sanding.

Rough cut neck ready for profiling and sanding.

Rough cut neck ready for profiling and sanding.

Rough cut neck ready for profiling and sanding.

Rough cut headstock ready for profiling and sanding.

Rough cut headstock ready for profiling and sanding.

Rough cut headstock ready for profiling and sanding.

Rough cut headstock ready for profiling and sanding.

Rough cut neck ready for profiling and sanding.

Rough cut neck ready for profiling and sanding.

Slab ebony fret board is "feathered" into headstock bevel.

Slab ebony fret board is “feathered” into headstock bevel.

rough-cut neck heel.

rough-cut neck heel.

After the fret board was glued to the neck slab it was time to do some cutting. First off the over-hanging ebony slab needed to be “feathered” into the headstock bevel using a very fine rasp (being very careful not to tear-out across the ends of the ebony).Then the excess maple from either side of the neck slab was trimmed with the band saw and my headstock template was spray glued to the headplate end and trimmed using the fret saw and coping saw. The next step will be to plane neck edges and headstcock straight edge then to profile curves using the bobbin sander. After this the back of the neck will be profiled by hand using different grade rasps and scrapers. Stand by!

TFM

WHAT TO LOOK FOR WHEN BUYING A GUITAR!

Generally speaking if you buy a brand new guitar then your choice and the quality of the instrument SHOULD be looked after by the retailer you choose to buy it from. If you are buying a new guitar then you are really looking for a reputable dealer to help you buy the guitar.

So here I’m primarily concerned with the assessment of used guitars, although much of the information contained may apply to shopping for new toys too!

When I first pickup a guitar for assessment, whether it be to purchase, to help someone else purchase or as an insurance appraisal I will first run through the assessment ABC that I developed when I first started working in the guitar industry. It’s a systematic approach to evaluating the worth and condition of a guitar, methodical and simple:

  • A for Authenticity. Can you determine beyond all doubt if the guitar being assessed is genuinely what it is advertised to be? Can you be certain that all parts are genuine and were added by the manufacturer at time of construction? If the guitar itself is genuine but some or all parts are replacement are they suitable for the guitar and of a similar quality and has this been reflected in the price of the instrument? If you believe the guitar may not be genuine then, unless you are mental, the next parts of the ABC does not apply and you should walk away.
  • B is for Build quality. Is the guitar’s quality of construction what you would expect from the company who built it. By that I mean you can’t judge the build quality of a Squire Stratocaster by the build standards of the Fender Custom Shop, you have to remain realistic when appraising the build quality of a guitar. When assessing build quality you will be checking for solid glue joints, tight screw fixtures, neat and parallel neck to body joints, fret work including well polished and well seated frets with no sharp ends and bevels cut and dressed at the correct angle, finish quality including colour coat and clear coat, placement and fit of hardware including tail and bridge assemblies and machine heads, fit and finish of string nut and string slots. If the guitar has build quality issues then you need to work out if these problems are just cosmetic or if they will have an effect on the guitar’s tone or playability. Are the build quality issues reflected in the advertised price of the instrument? If any build quality issues render the guitar useless then the next part of the ABC does not apply and you should walk away!
  • C is for Condition. It may sound bizarre to some but for me this is the last thing to consider unless it is obviously beyond the condition you would want to buy a guitar in. The reason this assessment comes last is that so often I have seen people so caught up in the guitars condition or lack there of that they completely forget about the other two things I have mentioned that are, arguably, way more critical. By condition we mean how the guitar has aged either by its natural environment and/or its previous owner(s).

Once you have been through the initial ABC style appraisal of the instrument and you are happy that it might be of interest it’s then, and only then that you can check the guitar for functionality, playability and tone.When assessing the guitar further we are looking for the condition of the serviceable parts of the guitar, probably the most critical thing to check on a guitar is if the truss rod works or not.

Now I understand that not everyone is going to be confident enough to get involved in such things but trust me it’s worth learning, if a guitars trust rod does not work, is stuck fast or even sheared then in all but very rare situations the guitar can be considered fire wood!

hendrix

When I check truss rods I will remove the truss rod nut and check, where possible, the threads of both mating surfaces and also check that by removing the nut that the neck has pulled into a forward bow as expected under string tension. I will then put the nut back on and gently tighten it and check that this action is gently pulling the neck towards a back bow with no concerning pops, clicks or cracks. We also need to check if the neck is “true” ie without twist, warp, hump or dip. To do this you can sight down the neck from the headstock end of the guitar using the strings as a straight edge. You are looking for any disparity between the two fret board edges of the neck and also looking for any dips or humps in the neck. Also check  the condition of the fret surfaces to make sure they are not too pitted or worn down flat and if they are then can the flat spots or pits be removed with a fret dress or will the guitar require a re-fret. Have the nut slots been worn down by the “sawing” action of the strings so that the strings have dropped too low to the first fret. Are all metal hardware parts still functioning and serviceable or are they worn and rusted solid.

There will be a guide for checking all these things added to the main menu of the blog soon and it will go a little deeper into the topics raised here. People selling guitars are finding sneaky ways to hide faults with them but trust your instinct….if it looks wrong, tastes wrong and smells wrong…it’s probably wrong!

If anyone has any worries or questions regarding a guitar they are looking to buy or a guitar they already own then shoot me a comment or message and I’ll see if i can shed any light!

TFM